
Émbaran Kasalametan penting
Read all instructions carefully before installation and operation. Failure to follow these instructions may result in electric shock, fire, or serious injury. This device is intended for indoor use only.
- PERHATOSAN: Risk of electric shock. Disconnect power at the circuit breaker or fuse box before installing or servicing.
- Pamasangan kedah dilakukeun ku tukang listrik anu mumpuni atanapi tanaga terlatih.
- Pastikeun sadaya sambungan kabel aman sareng sasuai sareng kode listrik lokal.
- Do not exceed the maximum electrical ratings of the timer.
- Keep children away from the timer and wiring during installation and operation.
Produk Leuwihview
The Intermatic 610224 is a digital 7-day programmable timer designed to automate the ON/OFF switching of electrical loads such as lights, fans, and other appliances. It features a clear digital display and intuitive controls for setting daily or weekly schedules. This timer operates at 120V AC and can handle loads up to 15 Amperes.
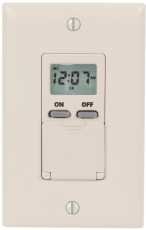
Gambar: Hareupeun view of the Intermatic 610224 Digital 7-Day Timer. The image displays the timer's ivory-colored faceplate with a digital screen at the top and several control buttons below it. The buttons are arranged for setting time, programming, and manual override functions.
Pamasangan
Follow these steps to properly install your Intermatic 610224 Digital 7-Day Timer.
- Pareuman Daya: Locate the circuit breaker or fuse that controls the power to the switch you are replacing. Turn off the power completely. Verify power is off using a voltage panguji.
- Hapus saklar anu aya: Carefully remove the wall plate and unscrew the existing switch from the wall box. Disconnect the wires from the old switch, noting which wire is connected to which terminal (Line, Load, Neutral, Ground).
- Sambungan Wiring: The Intermatic 610224 timer requires Line (hot), Load, Neutral, and Ground connections. Connect the wires from the wall box to the corresponding terminals on the timer:
- Nyambungkeun Jalur (Panas) wire (usually black) from the power source to the terminal marked 'LINE'.
- Nyambungkeun ngamuat wire (usually black, going to the fixture) to the terminal marked 'LOAD'.
- Nyambungkeun nétral wire (usually white) to the terminal marked 'NEUTRAL'.
- Nyambungkeun taneuh wire (usually bare copper or green) to the terminal marked 'GROUND'.
Note: A wiring diagram is typically included with the product packaging. Ensure all connections are tight and secure.
- Pamasangan: Gently push the wired timer into the wall box. Secure it with the provided screws. Attach the new wall plate.
- Mulangkeun Daya: Turn the power back on at the circuit breaker or fuse box. The timer display should illuminate.
Parentah Operasi
This section details how to set the current time and program ON/OFF events for your timer.
Nyetél Waktos sareng Poé Ayeuna
- Press the 'CLOCK' button. The time display will flash.
- Use the 'HOUR' and 'MIN' buttons to adjust the current hour and minute.
- Press the 'DAY' button to select the current day of the week.
- Press 'CLOCK' again to save the settings and exit.
Programming ON/OFF Events
The timer allows for multiple ON/OFF programs per day. Refer to your specific model's manual for the exact number of programs (typically up to 14 ON and 14 OFF events).
- Press the 'PROG' button. The display will show '1 ON' and the time will flash.
- Use the 'HOUR' and 'MIN' buttons to set the desired ON time for program 1.
- Press the 'DAY' button repeatedly to select the day(s) of the week for this program (e.g., Mon-Sun, Mon-Fri, Sat-Sun, individual days).
- Press 'PROG' again. The display will show '1 OFF' and the time will flash.
- Use the 'HOUR' and 'MIN' buttons to set the desired OFF time for program 1.
- Press the 'DAY' button to select the day(s) for this OFF program, matching the ON program.
- Repeat steps 1-6 for additional ON/OFF programs (e.g., '2 ON', '2 OFF', etc.).
- After setting all desired programs, press the 'CLOCK' button to exit programming mode.
Manual Override
To temporarily override the current program without deleting it:
- Press the 'MANUAL' button. This will cycle the output between ON, OFF, and AUTO modes.
- In 'AUTO' mode, the timer follows the programmed schedule.
- In 'ON' or 'OFF' mode, the timer will remain in that state until the next programmed event or until 'MANUAL' is pressed again to return to 'AUTO'.
Adjustment Waktos Hemat Panonpoé
Some models may have an automatic Daylight Saving Time adjustment feature. If not, manually adjust the time by one hour forward or backward as required using the 'HOUR' button in clock setting mode.
Pangropéa
The Intermatic 610224 Digital 7-Day Timer requires minimal maintenance.
- beberesih: To clean the timer, wipe the surface with a soft, damp lawon. Ulah make cleaners abrasive atawa pangleyur, sabab bisa ngaruksak finish atawa komponén internal.
- Cadangan batré: This timer typically includes an internal battery backup to retain programmed settings during power outages. The battery is usually non-replaceable by the user and designed to last the life of the product. If the display is blank or programs are lost after a power outage, the battery may be depleted, indicating the unit may need replacement.
Pamérésan masalah
If you encounter issues with your timer, refer to the following common problems and solutions.
| Masalah | Mungkin Cukang lantaranana | Solusi |
|---|---|---|
| Tampilan pangatur waktu kosong. | No power to the timer. | Check circuit breaker or fuse. Ensure wiring connections are secure. |
| Timer does not turn ON/OFF at programmed times. | Incorrect programming; Timer is in Manual ON/OFF mode. | Review programming steps. Ensure timer is in 'AUTO' mode (press 'MANUAL' button until 'AUTO' is displayed). |
| Waktosna teu leres saatos pareum listriktage. | Internal battery backup depleted. | Reset the current time and day. If this occurs frequently, the timer may need replacement. |
| Load (light/appliance) does not turn on. | Load is faulty; Wiring issue; Timer is OFF. | Test the load directly. Check wiring connections. Ensure timer is programmed to ON or manually set to ON. |
spésifikasi
- model: 610224
- Voltage: 120V AC, 60Hz
- Peunteun ayeuna: 15A Resistive, 10A Tungsten, 1/2 HP
- Program Cycles: 7-dinten
- Program: Up to 28 ON/OFF events (14 ON, 14 OFF)
- Suhu operasi: 0°C nepi ka 50°C (32°F nepi ka 122°F)
- Kandang: Ivory, Wall Mount
Garansi sareng Rojongan
Intermatic products are manufactured to high-quality standards and are backed by a manufacturer's warranty. For specific warranty details, please refer to the warranty card included with your product or visit the official Intermatic websitus.
For technical support, troubleshooting assistance, or to inquire about replacement parts, please contact Intermatic customer service. Contact information can typically be found on the product packaging or the manufacturer's websitus.