
1. Bubuka
This manual provides essential instructions for the setup, operation, maintenance, and troubleshooting of your Shuttle XPC Slim DH610 Barebone PC. The DH610 is a compact and versatile barebone system designed to support Intel 12th and 13th Generation LGA1700 processors, offering robust performance for various applications including office, digital signage, and kiosks.
2. Émbaran Kasalametan
Mangga baca tur turutan tungtunan kaamanan ieu pikeun nyegah karuksakan kana alat atawa tatu pikeun diri anjeun:
- Always disconnect the power cord before performing any installation or maintenance.
- Ensure the system is placed on a stable, flat surface with adequate ventilation.
- Ulah ngalaan alat ka beueus, suhu ekstrim, atawa sinar panonpoé langsung.
- Only use the power adapter provided or an approved equivalent.
- Refer to qualified service personnel for any repairs not covered in this manual.
3. Eusi Paket
Pastikeun yén sadaya item aya dina pakét anjeun:
- Shuttle XPC Slim DH610 Barebone PC Unit
- VESA Gunung Kit
- Adaptor kakuatan sareng kabel
- Accessory Pack (screws, cables, etc.)
- Pituduh Mimitian Gancang (upami kalebet)
4. Setup jeung Instalasi
The Shuttle DH610 is a barebone system, requiring the installation of a CPU, RAM, and storage devices before operation.
4.1. Opening the Chassis
Carefully remove the chassis cover to access the internal components. Typically, this involves unscrewing a few screws on the rear or sides of the unit and sliding the cover off.

Image: The Shuttle XPC Slim DH610 with its top cover removed, showing the internal layout including cooling fans and the motherboard.
4.2. Pamasangan CPU
The DH610 supports Intel 12th/13th Generation Alder Lake-S LGA1700 processors with a maximum TDP of 65W. Ensure your chosen CPU has integrated graphics, as the system does not support F-series processors without integrated graphics or K-series processors.
- Buka uas stop kontak CPU jeung cabut panutup pelindung.
- Carefully align the CPU with the socket, matching the triangular markers.
- Gently nempatkeun CPU kana stop kontak tanpa maksa eta.
- Tutup uas stop kontak pikeun ngamankeun CPU.
- Pasang cooler CPU nurutkeun parentah produsén na.
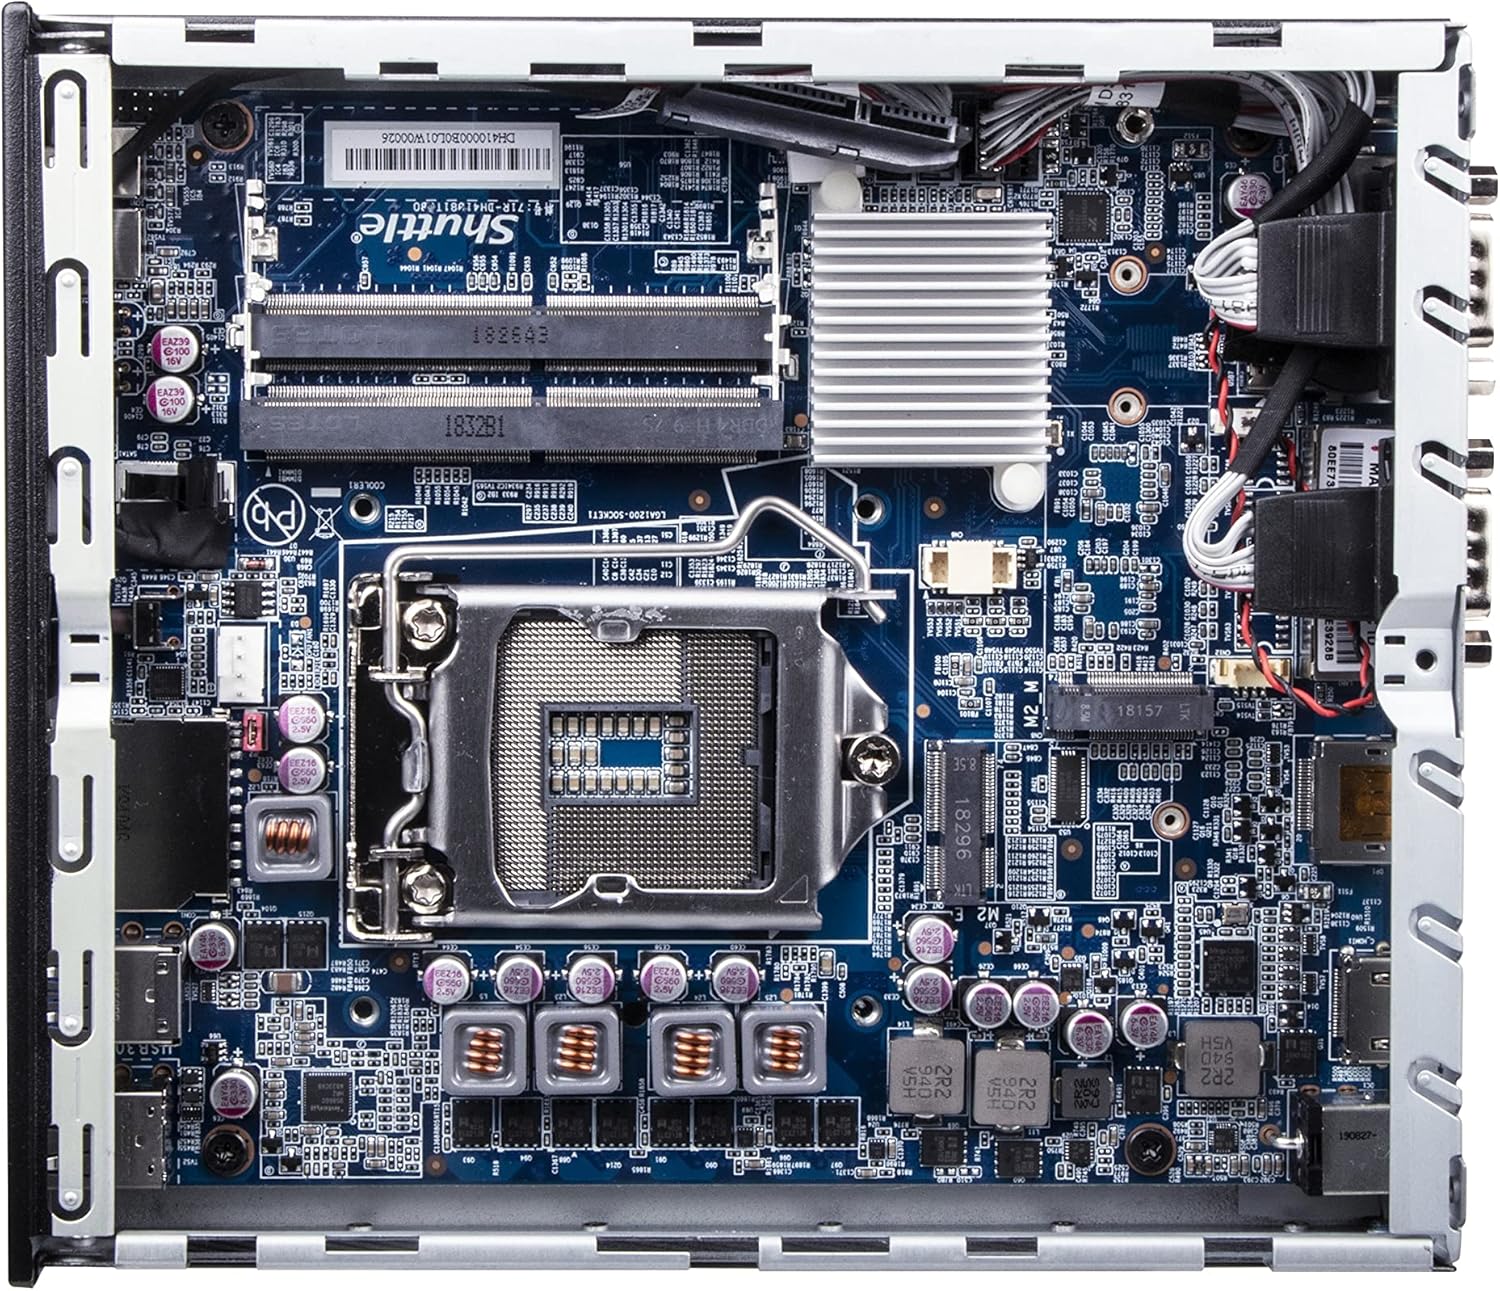
Gambar: A lengkep view of the Shuttle DH610 motherboard, highlighting the LGA1700 CPU socket, RAM slots, and other integrated circuits.
Note: For 13th Gen Intel Processors, BIOS Version DH610000.202 or newer is required. Update BIOS if necessary after initial setup with a 12th Gen CPU or via a compatible method.
4.3. Pamasangan RAM
The system features two 260-pin dual-channel DDR4 SODIMM slots, supporting up to 64GB (2x 32GB) at 3200MHz. Dual-channel memory is recommended for optimal performance.
- Locate the SODIMM slots on the motherboard.
- Sejajarkeun takik dina modul RAM sareng konci dina slotna.
- Insert the module at a 45-degree angle and push down until the clips on both sides snap into place.
4.4. Pamasangan Panyimpenan
The DH610 supports one 2.5-inch HDD/SSD and one M.2 2280 SSD.
- 2.5" Drive: Mount the 2.5" HDD/SSD into the designated bay using the provided screws and connect the SATA data and power cables.
- M.2 SSD: Insert the M.2 2280 SSD into its slot, securing it with the provided screw.
4.5. Nyambungkeun périferal
After installing internal components, reattach the chassis cover. Connect your peripherals to the available ports:
- tampilan: Connect your monitor(s) to the HDMI 2.0b port or one of the two DisplayPort outputs. The system supports up to three 4K UHD displays.
- Alat USB: Use the four USB 3.2 Gen1 ports (including one Type-C) and four USB 2.0 ports for keyboard, mouse, and other USB devices.
- Jaringan: Connect to your network using either of the two Gigabit Ethernet LAN ports (Intel 2.5GbE + Intel 1GbE).
- Serial Devices: Utilize the two RS232 COM ports for compatible devices.
- Audio: Connect headphones or a microphone to the front audio jacks.

Image: The front panel of the Shuttle DH610, featuring the power button, USB 3.2 Gen1 ports (one Type-C), and audio input/output jacks.

Image: The rear panel of the Shuttle DH610, displaying the DC-IN power input, HDMI, two DisplayPort outputs, two LAN ports, USB ports, and two COM ports.
4.6. Sambungan Daya
Connect the power adapter to the DC-IN port on the rear of the unit, then plug the power cord into an electrical outlet.
5. Parentah Operasi
5.1. Powering on / Pareum
- Daya Hurung: Pencét tombol daya anu aya dina panel hareup.
- Pareum listrik: Perform a graceful shutdown through your operating system. Alternatively, press and hold the power button for 4-5 seconds for a forced shutdown (use only when necessary).
5.2. Pamasangan Sistem Operasi
The DH610 is compatible with Windows 11/10 (64-bit) and Linux (64-bit) operating systems. Follow the standard installation procedures for your chosen OS. Ensure all necessary drivers are installed for optimal performance, which can typically be found on the Shuttle support websitus.
5.3. mios / UEFI Aksés
Pikeun ngaksés utilitas setelan BIOS/UEFI, pencét tombol Hapus or F2 key repeatedly during system startup. This allows configuration of boot options, system settings, and hardware parameters.
6. Pangropéa
6.1. beberesih
Regularly clean the exterior of the unit with a soft, dry cloth. Use compressed air to clear dust from ventilation openings to ensure proper airflow and prevent overheating. Do not use liquid cleaners directly on the device.
6.2. BIOS Apdet
Periodically check the Shuttle website for BIOS updates. BIOS updates can improve system stability, add support for new hardware (like 13th Gen Intel CPUs), and fix bugs. Follow the instructions provided with the BIOS update package carefully.
7. Cara ngungkulan
If you encounter issues with your DH610, refer to the following common problems and solutions:
- Henteu aya kaluaran tampilan:
- Ensure the monitor is powered on and correctly connected to the HDMI or DisplayPort.
- Verify that the CPU has integrated graphics and that the display cable is connected to the motherboard's video output, not a discrete graphics card (if applicable).
- Coba kabel tampilan atanapi monitor anu béda.
- Sistem Henteu Diaktipkeun:
- Check that the power adapter is securely connected to both the unit and the electrical outlet.
- Ensure the CPU and RAM are correctly installed and seated.
- Nguji stop kontak listrik ku alat sejen.
- 13th Gen CPU Not Recognized:
- The system requires BIOS Version DH610000.202 or newer for 13th Gen Intel processors. If you have an older BIOS, you may need to install a 12th Gen CPU first to update the BIOS.
- Sistem Overheating:
- Ensure the chassis ventilation holes are not obstructed.
- Clean any dust accumulation from the internal fans and heatsinks.
- Verify the CPU cooler is properly installed and making good contact with the CPU.
8. Spésifikasi
| Fitur | Spésifikasi |
|---|---|
| merek | Angkot |
| Ngaran modél | DH610 |
| CPU Socket | LGA 1700 |
| Prosesor anu dirojong | Intel 12th/13th Gen Alder Lake-S (65W max, with integrated graphics) |
| Chipset | Intel H610 |
| Tipe RAM | DDR4 SODIMM (2x slots) |
| Kamampuh RAM Max | 64 GB (2x 32 GB) |
| Laju mémori | Nepi ka 3200 MHz |
| Grafika | Integrated Intel UHD Graphics (CPU dependent) |
| Kaluaran Video | 1x HDMI 2.0b, 2x DisplayPort (Supports triple 4K UHD displays) |
| Panyimpenan | 1x 2.5" HDD/SSD bay, 1x M.2 2280 slot |
| palabuhan USB | 4x USB 3.2 Gen1 (1x Type-C), 4x USB 2.0 (Total 8) |
| LAN | 1x Intel 2.5GbE, 1x Intel 1GbE |
| Palabuhan Serial | 2x RS232 (COM) |
| Kasaluyuan System Operasi | Windows 11/10 (64-bit), Linux (64-bit) |
| Konsumsi Daya | 65 Watts (CPU) |
| Komponén Kaasup | Gunung VESA |
9. Garansi jeung Rojongan
9.1. Garansi Produsén
The Shuttle XPC Slim DH610 Barebone PC comes with a 3-Year Manufacturer's Warranty. This warranty covers defects in materials and workmanship under normal use. Please retain your proof of purchase for warranty claims.
9.2. Rojongan Téknis
For technical assistance, driver downloads, BIOS updates, or further troubleshooting not covered in this manual, please visit the official Shuttle website or contact Shuttle customer support. Free lifetime technical support is typically provided by the manufacturer.
Kanggo inpo nu leuwih lengkep, mangga buka: www.shuttle.com