
1. Bubuka
This manual provides instructions for the installation, operation, and maintenance of your NETGEAR GS305P 5-Port PoE Gigabit Ethernet Unmanaged Switch. This device is designed to expand your network connectivity with both standard Gigabit Ethernet and Power over Ethernet (PoE+) capabilities, ideal for small office or home network environments.
2. Eusi Paket
Pariksa yén pakét anjeun ngandung barang-barang ieu:
- NETGEAR GS305P 5-Port PoE Gigabit Ethernet Unmanaged Switch (GS305Pv3)
- adaptor kakuatan
- Kit Wallmount
- Pituduh instalasi gancang

Image: The NETGEAR GS305P switch, power adapter, and power cord as typically found in the package.
3. Produk Langkungview
The NETGEAR GS305P is an unmanaged switch featuring 5 Gigabit Ethernet ports, with 4 of these ports supporting PoE+ (Power over Ethernet Plus). It provides a total power budget of 63W for connected PoE devices. The switch is designed for plug-and-play operation, requiring no software installation or configuration.
Video: Hiji leuwihview of the NETGEAR 5-Port PoE Switch, demonstrating its features and ease of use.
Panel hareup

Image: Front panel of the GS305P switch, highlighting the 5 Gigabit Ethernet ports and LED indicators for power, PoE Max, link/activity, and PoE fault.
- LED kakuatan: Nunjukkeun status kakuatan.
- PoE Max LED: Illuminates when PoE power consumption is near maximum capacity.
- Link/Activity LEDs (Ports 1-5): Green for 1000Mbps link, Yellow for 10/100Mbps link. Blinks to indicate activity.
- PoE Status LEDs (Ports 1-4): Green for PoE powered, Yellow for PoE fault.
- Port Ethernet (1-5): RJ-45 ports for network connections. Ports 1-4 support PoE+.
4. Setup jeung Instalasi
The NETGEAR GS305P switch is designed for simple plug-and-play installation. No software configuration is required.
4.1 Nyambungkeun Saklar
- Connect the power adapter to the switch's power input and then plug the power adapter into an electrical outlet. The Power LED on the switch will illuminate.
- Connect your router or modem to any of the 5 Gigabit Ethernet ports on the switch using an Ethernet cable.
- Connect your network devices (computers, printers, network storage) to the remaining Gigabit Ethernet ports. For PoE-powered devices (e.g., IP cameras, wireless access points), connect them to ports 1-4.

Image: A diagram illustrating the plug-and-play nature of the unmanaged switch, connecting various devices like WiFi Access Points, IP Cameras, Computers, and NAS.
4.2 Pilihan pamasangan
The GS305P switch can be placed on a desktop or mounted on a wall. A wallmount kit is included for secure installation.
- Penempatan Desktop: Ensure the switch is placed on a flat, stable surface with adequate ventilation.
- Tembok Gunung: Use the provided wallmount kit to secure the switch to a wall. Refer to the quick installation guide for detailed steps on wall mounting.
5. Ngoperasikeun Switch
Once connected, the switch operates automatically. The LEDs provide visual feedback on the network status.
- Daya Hurung: The Power LED will be green when the switch is receiving power.
- Network Activity: The Link/Activity LEDs will light up when a device is connected and blink to indicate data transmission.
- Daya PoE: For PoE-powered devices, the PoE Status LED will be green when power is being supplied. If a PoE fault occurs, the LED will turn yellow.
- Operasi jempé: The fanless design ensures quiet operation, making it suitable for noise-sensitive environments.
6. Pangropéa
To ensure optimal performance and longevity of your switch, follow these maintenance guidelines:
- beberesih: Anggo lawon anu lembut sareng garing pikeun ngabersihan bagian luar saklar. Entong nganggo pembersih cair atanapi aerosol.
- Ventilasi: Pastikeun yén bukaan ventilasi teu diblokir pikeun nyegah overheating.
- Lingkungan: Operate the switch within its specified temperature and humidity ranges. Avoid direct sunlight or extreme temperatures.
- Manajemén Kabel: Jaga kabel jaringan tetep teratur pikeun nyegah tegangan dina port sareng ningkatkeun aliran hawa.
7. Cara ngungkulan
If you encounter issues with your NETGEAR GS305P switch, refer to the following common troubleshooting steps:
- Henteu aya kakuatan: Ensure the power adapter is securely connected to the switch and a working electrical outlet. Check the Power LED.
- Henteu aya tautan / kagiatan: Verify that Ethernet cables are properly connected to both the switch and the connected device. Try a different cable or port. Check the Link/Activity LED.
- Alat PoE Henteu Diaktipkeun: Ensure the device is PoE-compatible and connected to one of the PoE+ ports (1-4). Check the PoE Status LED for the port; a yellow light indicates a fault. Verify the total power budget (63W) is not exceeded by all connected PoE devices.
- Lambat Jaringan: Ensure all connected devices and cables support Gigabit Ethernet for optimal performance. Check for excessive network traffic.
8. Spésifikasi
Key technical specifications for the NETGEAR GS305P switch:
| Fitur | Katerangan |
|---|---|
| Modél | GS305P (GS305Pv3) |
| Jumlah Palabuhan | 5 palabuhan Gigabit Ethernet |
| PoE + palabuhan | 4 (Ports 1-4) |
| Total Anggaran Daya PoE | 63W |
| Laju Mindahkeun Data | 1000 Mbps (Gigabit) |
| Pindah Tipe | Teu kaurus |
| Bahan Kasus | logam |
| Ukuran (L x W x H) | 9.5" x 6.7" x 3.4" (approximate, from product data) |
| Voltage | 240 Volts (Power adapter input) |
| Lingkungan Operasi | Designed for indoor use in U.S. & CA. |
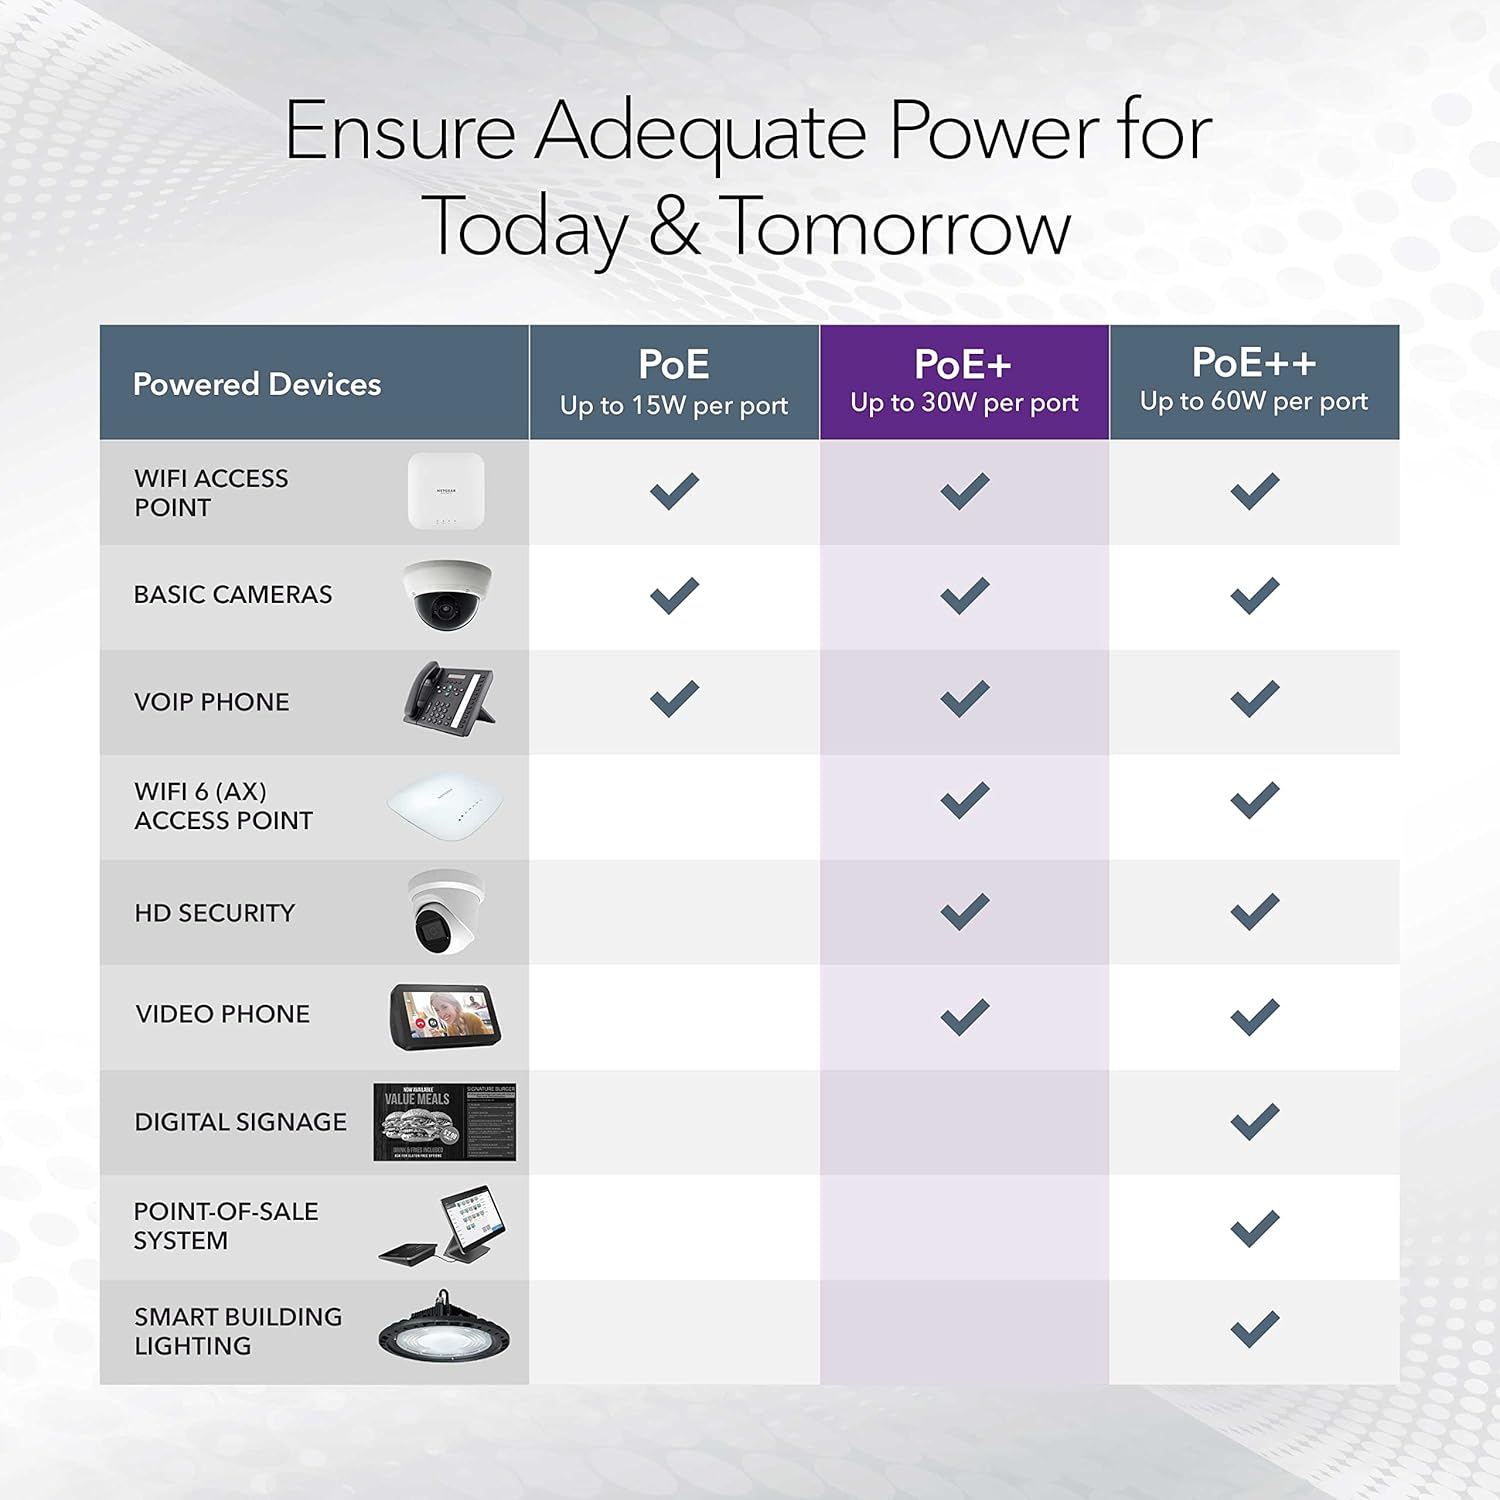
Image: A table illustrating the power capabilities of PoE, PoE+, and PoE++ for different powered devices.
9. Garansi jeung Rojongan
9.1 Émbaran jaminan
The NETGEAR GS305P switch comes with an industry-leading 3-taun jaminan hardware kawates. Please retain your proof of purchase for warranty claims. For full warranty terms and conditions, refer to the official NETGEAR websitus atanapi dokuméntasi anu kalebet sareng produk anjeun.
9.2 Rojongan Téknis
For technical assistance, product registration, or to access additional resources, visit the official NETGEAR support website. You can find FAQs, firmware updates, and community forums there.
Dukungan NETGEAR Websitus: www.netgear.com/support