
1. Bubuka
This manual provides detailed instructions for the installation, operation, and maintenance of the EVURU Digital Single Phase Energy Meter. This device is designed to measure active energy (kWh), voltage, current, and power consumption in single-phase AC circuits. Please read this manual thoroughly before installation and use to ensure safe and correct operation.
2. Émbaran Kasalametan
- Pamasangan sareng pangropéa ngan kedah dilakukeun ku tanaga anu mumpuni.
- Ensure the power supply is disconnected before any installation or wiring work.
- Do not operate the meter in environments with excessive moisture, dust, or corrosive gases.
- Pastikeun sadaya sambungan aman sareng leres numutkeun diagram kabel pikeun nyegah karusakan kana méteran atanapi sistem listrik.
- The meter is designed for indoor use only.
3. Produk Langkungview jeung Fitur
The EVURU Digital Single Phase Energy Meter is a compact device for DIN rail installation, offering precise measurement of electrical parameters. Key features include:
- LCD display with backlight for clear readings.
- Measures total Energy (kWh), temporary Energy (kWh), real Voltage (V), real Current (A), and real Power (W).
- Pulse LED indicator for active energy measurement.
- 35mm DIN rail mounting.
- Temporary kWh can be reset to zero. Total kWh is non-resettable.

Gambar 1: Leuwihview of DDS662, DDS667, and DDS668 models.

Figure 2: Feature comparison table for DDS662, DDS667, and DDS668 models.
4. Spésifikasi
| Parameter | Nilai |
|---|---|
| Arus maksimum | 80A |
| Frékuénsi pulsa | 1000 imp / kWh |
| Nominal Voltage | 220V AC |
| Pamasangan | 35mm DIN Rail |
| Tipe tampilan | LCD sareng Lampu latar |
| Parameter anu diukur | Total kWh, Temporary kWh, Voltage, Arus, Daya |
| Temporary kWh Reset | Yes (hold button for 6 seconds) |
| Total kWh Reset | No |
| Wiring Modes | Upper input lower output, Lower input upper output |
| Item Beurat | 0.035 ons (kira-kira 1 gram) |
5. Instalasi (Setup)
5.1 Ukuran
Before installation, ensure adequate space for the meter. The dimensions are suitable for standard DIN rail enclosures.

Figure 3: Meter dimensions (example shown for DDS668).
5.2 DIN Rail ningkatna
The meter is designed for 35mm DIN rail installation. Simply clip the meter onto the DIN rail in your electrical panel.
5.3 Diagram Wiring
Ensure all power is OFF before proceeding with wiring. Connect the meter according to the appropriate diagram for your model and desired wiring mode.
5.3.1 DDS662 Wiring
The DDS662 model typically uses a direct connection for single-phase two-wire systems.

Figure 4: Wiring diagram for DDS662 model.
5.3.2 DDS667 Wiring
The DDS667 model can be integrated with circuit breakers for protection.

Figure 5: Wiring diagram for DDS667 model, showing integration with circuit breakers.
5.3.3 DDS668 Wiring Modes
The DDS668 model supports two wiring configurations: upper input/lower output and lower input/upper output.
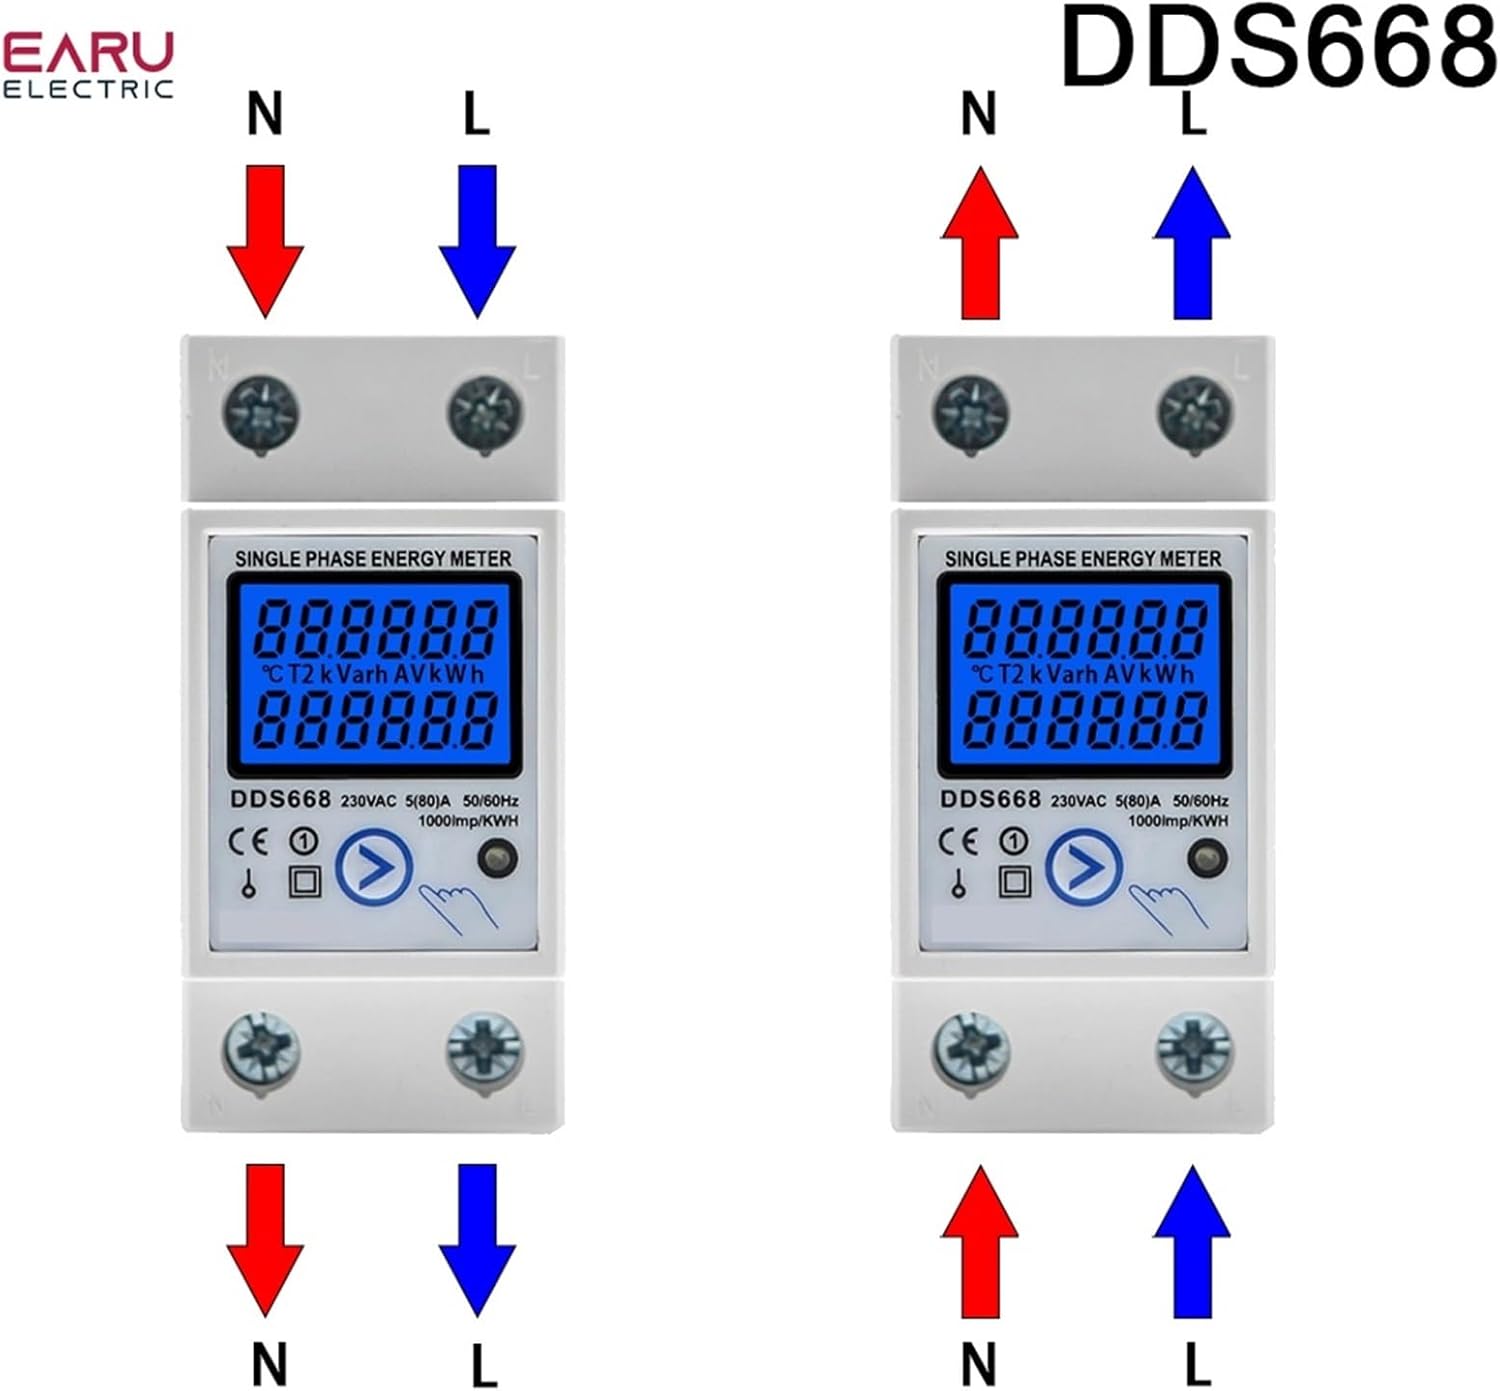
Figure 6: Wiring diagrams for DDS668 model, illustrating upper input/lower output and lower input/upper output modes.
6. Operasi
6.1 Kakuatan Hurung
Once correctly wired and mounted, restore power to the circuit. The LCD display will illuminate, showing the current readings.
6.2 Reading Displayed Values
The meter cycles through various parameters on its LCD display. You can manually press the button (if available on your model, e.g., DDS667, DDS668) to cycle through:
- Total Énergi (kWh)
- Temporary Energy (kWh)
- Real Voltage (V)
- Real Current (A)
- Daya Nyata (W)
The pulse LED will flash to indicate active energy measurement.
6.3 Resetting Temporary kWh
To reset the temporary kWh reading to zero, press and hold the button on the front of the meter for approximately 6 seconds. Note that the total kWh reading cannot be reset.
7. Pangropéa
The EVURU Digital Single Phase Energy Meter requires minimal maintenance.
- Keep the meter clean and free from dust. Use a soft, dry cloth for cleaning.
- Ulah make cleaners abrasive atawa pangleyur.
- Pariksa sambungan kabel sacara rutin pikeun ningali pageuhna sareng tanda-tanda karusakan atanapi karusakan.
- Ensure the operating environment remains within specified conditions (temperature, humidity).
8. Cara ngungkulan
- No Display / Meter Not Powering On:
- Check the power supply to the circuit.
- Pariksa sadaya sambungan kabel aman sareng leres numutkeun diagram.
- Bacaan anu salah:
- Ensure the meter is correctly wired for the load. Incorrect wiring can lead to inaccurate measurements.
- Konfirmasi voltage and current are within the meter's specified range (e.g., 220V AC, max 80A).
- Temporary kWh Not Resetting:
- Ensure you are holding the reset button for the full 6 seconds.
- Note that the total kWh cannot be reset.
- Pulse LED Not Flashing:
- Verify there is an active load connected and drawing power through the meter.
- Check wiring for proper current flow.
9. Garansi jeung Rojongan
Kanggo inpormasi garansi atanapi dukungan téknis, mangga tingal bungkusan produk atanapi ngahubungi pangecér anjeun. Simpen resi pameseran anjeun salaku bukti pameseran.