
1. Bubuka
This manual provides essential information for the safe and efficient operation, maintenance, and troubleshooting of your FOHERE Commercial Slushy Machine, Model 300A-S. Please read all instructions carefully before use and retain this manual for future reference.
2. Parentah Kasalametan penting
- Salawasna mastikeun mesin disimpen dina stabil, permukaan datar.
- Ulah ngoperasikeun mesin nganggo kabel atanapi colokan anu rusak.
- Tetep leungeun bersih tina bagian nu pindah salila operasi.
- Cabut colokan mesin sateuacan ngabersihkeun atanapi ngalakukeun perawatan naon waé.
- Mastikeun ventilasi ditangtoskeun sabudeureun mesin pikeun nyegah overheating.
- Minimum sugar content in liquid must not be less than 13%. For liquids with alcohol, the temperature needs to be set around -9°C.
- Always add liquid over the white plastic beater (minimum water level).
3. Eusi Paket
Your FOHERE Commercial Slushy Machine package includes:
- Commercial Slushy Machine (Main Unit)
- Dual 15L Food-Grade Tanks with Lids
- Helical Augers (Mixing Shafts)
- Dulang Ngajajar
- Instruksi Manual
4. Parentah Setup
4.1 Ngabongkar sareng Nempatkeun
Carefully remove all packaging materials. Place the machine on a sturdy, level countertop with adequate ventilation space around it.
4.2 Majelis
Before first use, ensure all removable parts are clean and properly assembled.
- Place the sealing ring onto the stainless steel cylinder.
- Insert the stainless steel cylinder into the tank.
- Attach the helical auger onto the shaft inside the cylinder.
- Push the tank firmly onto the base, ensuring it aligns with the seal.
- Place the lid securely on top of the tank.
- Pasangkeun baki tetesan di handap corong dispensing.
5. Parentah Operasi
5.1 Ngeusian Tangki
Open the tank lids and pour your desired beverage mixture into each tank. Ensure the liquid level is above the minimum water level mark on the tank to prevent damage to the machine. Close the lids securely.
5.2 Control Panel Leuwihview
The control panel allows you to manage the machine's functions. It features buttons for mixing, cold drink mode, slush mode, lighting, and temperature settings.
5.3 Making Slushies/Cold Drinks
- Ensure the machine is plugged in and the power switch is ON.
- Press the 'MIXING' key to activate the mixing function for each tank.
- Select 'SLUSH' mode for frozen beverages or 'COLDDRINK' mode for chilled beverages.
- Adjust the temperature using the 'TEMPSETTING' or 'SET' and 'ADD/SUBTRACT' keys as needed.
- Wait for the machine to reach the desired consistency (approx. 25-30 minutes for slushies).
- Dispense by pulling the handle on the front of each tank.

5.4 Adjusting Minimum Temperature
To adjust the minimum temperature for slush mode:
- Press 'SET' and 'ADD' simultaneously until 'P00' appears on the screen. Release both buttons.
- Press 'LIGHTING' to cycle through 'P00' to 'P02'.
- Once 'P02' is displayed, press 'SUBTRACT' to adjust the temperature to -15°C.
- The machine will automatically save the setting after a few seconds of inactivity.
6. Pangropéa
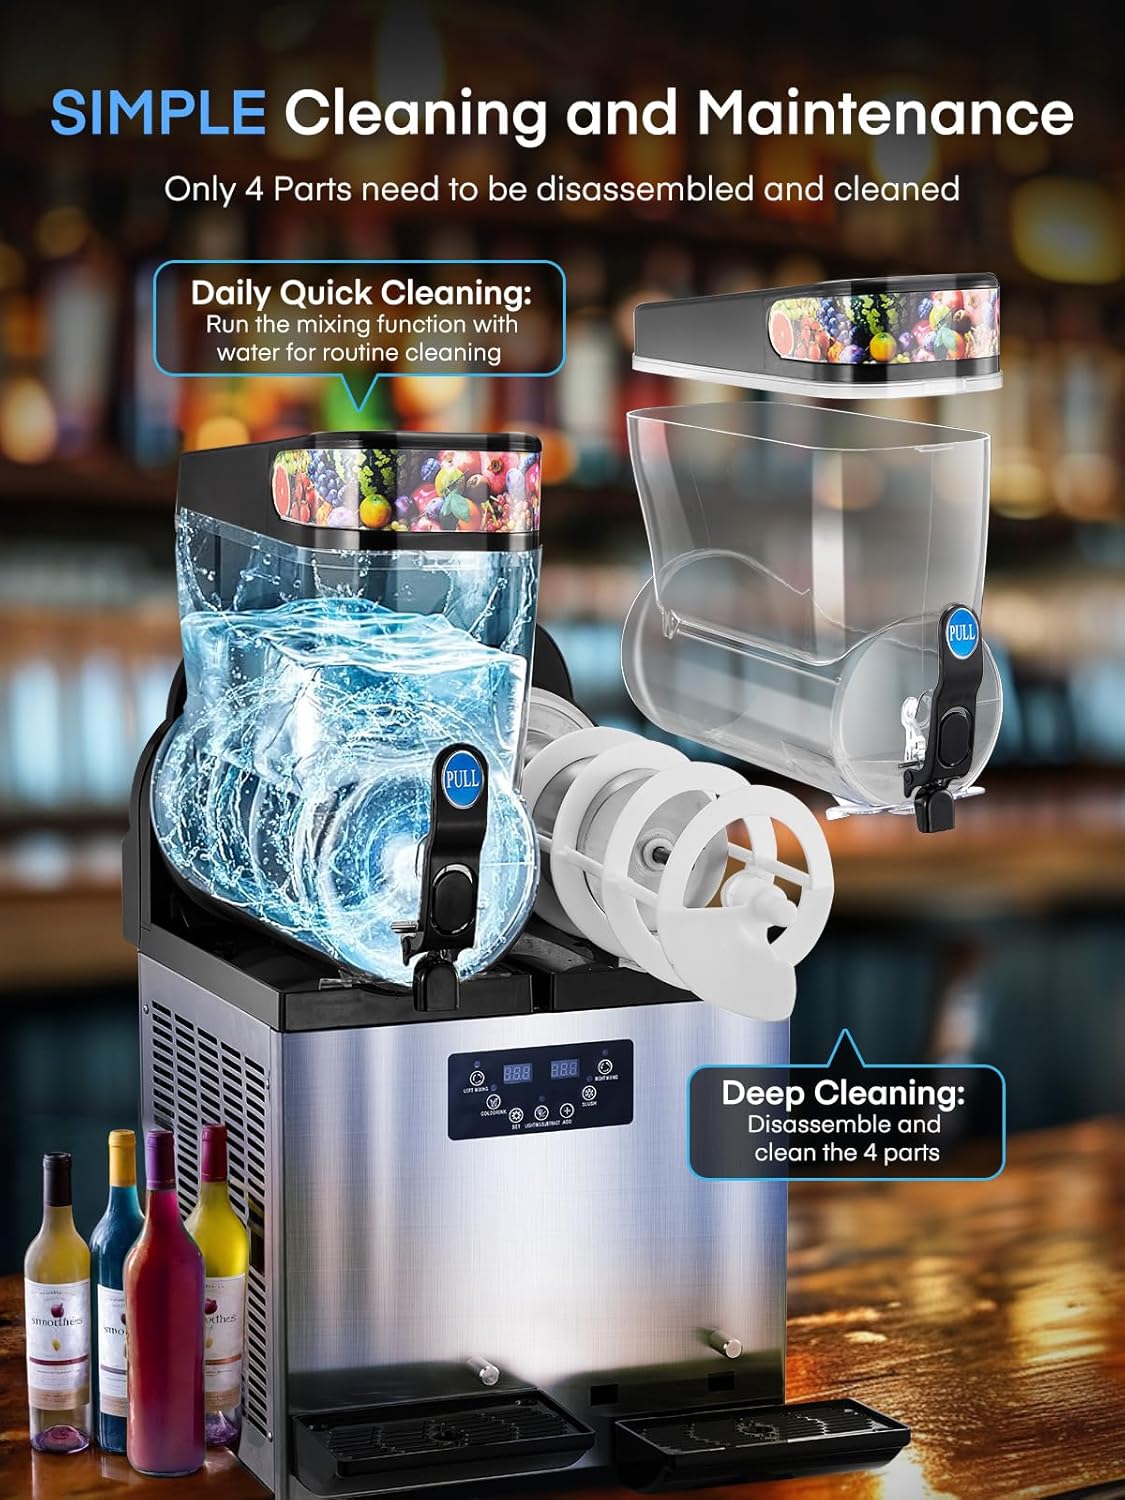
6.1 beberesih poean
- Turn off the slush function and dispense any remaining material.
- Pour water into the tanks and stir for approximately 1 minute, then drain the water.
- Turn off the lighting and mixing functions, then switch off the main power.
6.2 Jero beberesih
For deep cleaning, disassemble the tanks, augers, and seals. Wash them thoroughly with detergent and warm water. Ensure all parts are completely dry before reassembly.
6.3 Seal Replacement
If you notice any leakage, the seals may need replacement. Remove the pin and piston from the dispensing handle, take off the old seal, and replace it with a new one. Reinstall the components.
6.4 Handle Replacement
To replace a damaged handle, first remove the existing handle by pressing the pin. Check the seal for damage and replace if necessary. Install the new handle by aligning the pin and pushing it into place.
6.5 Motor and Shaft Replacement
If the motor or shaft requires replacement, carefully unscrew the back panel and the motor screws. Disconnect the old motor and install the new one, ensuring all connections are secure.
6.6 Temperature Sensor Replacement
To replace the temperature sensor, unscrew the side panel, unplug the old sensor wire, and carefully remove the sensor. Install the new sensor and reconnect the wiring.
7. Cara ngungkulan
| Masalah | Mungkin Cukang lantaranana & Solusi |
|---|---|
| Error Code "LLL" | Nunjukkeun volum anu handaptage alert. Check the operating voltage. If regular, contact after-sales service. |
| Mixture Leakage | Remove the material cylinder and mixing shaft. Adjust the placement of the sealing ring or use a new one. Ensure the material cylinder is pressed against the seal and the front is jammed to prevent dislodging. |
| Display Does Not Light Up (Powered On) | Check the wires connecting to the plastic switch for looseness. Re-check wires on the power switch for looseness. Confirm motherboard wires are secure. Check connecting wires between motherboard and display. |
| Display Shows 'rh' | This error indicates a potential issue with the solenoid valve. Remove the screw on the solenoid valve with a screwdriver and energize the machine. Lift the solenoid valve upward by hand; normally there is resistance and a “zip” sound. If it lifts easily and makes no sound, it's faulty. (Note: Test must be conducted with the display energized to be effective). |
| Machine Can't Mix | Check the 3 wires on the motherboard for looseness or disconnection. Open the black rear cover panel and check the wires on the motor for any dislodged connections; try plugging them back in. |
| 1 or 2 Tanks Not Dropping Temperature | Locate the 2 wires on the motherboard for the affected tank and check for loose or disconnected wires. |
| Fan Blades Not Turning in 'SLUSH' Mode | Locate the 2 wires for the fan on the motherboard and check for loose or disconnected wires. |
| No Start-Up Sound from Compressor in 'SLUSH' Mode | Locate the 2 wires for the compressor on the motherboard and check for loose or disconnected wires. |
8. Spésifikasi
| Fitur | Rincian |
|---|---|
| merek | FÉRÉ |
| Nomer modél | 300A-S |
| Warna | pérak |
| Kapasitas | 30 Liters (2 x 15L Tanks) |
| Bahan | Beusi sténless |
| Komponén Kaasup | Mesin Slushie |
| Ukuran barang (L x W x H) | 21.65 "L x 16.3" W x 32.28" H |
| Item Beurat | 134.92 pon |
| Modeu Operasi | Otomatis |
| Parentah Perawatan Produk | Nyeuseuh leungeun |
9. Garansi jeung Rojongan
The FOHERE Commercial Slushy Machine is ETL certified and approved for commercial use, ensuring high quality and reliability. For any issues or support, please refer to the troubleshooting section or contact FOHERE customer service. Warranty details are typically provided with your purchase documentation.
Inpormasi kontak: Please refer to your product packaging or the official FOHERE websitus kanggo kéngingkeun detil kontak dukungan palanggan anu pangénggalna.


