1. Bubuka
This manual provides essential instructions for the safe and efficient operation of your SINGER Start 1306 Sewing Machine. Please read it thoroughly before using the machine to ensure proper setup, usage, and maintenance. The SINGER Start 1306 is designed for home sewing projects, featuring 6 built-in stitches, easy threading, and a 4-step buttonhole function.

Gambar 1.1: Hareupeun view of the SINGER Start 1306 Sewing Machine.
2. Émbaran Kasalametan
Salawasna turutan pancegahan kaamanan dasar nalika nganggo alat listrik pikeun ngirangan résiko kahuruan, kejutan listrik, atanapi tatu.
- Baca sadaya parentah sateuacan nganggo mesin.
- Jauhkeun mesin tina cai atanapi permukaan anu baseuh.
- Unplug the machine from the electrical outlet when not in use, when servicing, or when changing accessories.
- Entong pernah ngoperasikeun mesin upami kabel atanapi colokanna rusak, upami henteu tiasa dianggo kalayan leres, atanapi upami parantos murag atanapi ruksak.
- Jauhkeun ramo tina sadaya bagian anu obah. Perhatosan khusus diperyogikeun di jarum mesin jahit.
- Paké ngan asesoris dianjurkeun ku produsén.
- Ulah leupaskeun atanapi nyelapkeun obyék naon waé kana bukaan naon waé.
3. Setélan
3.1 Ngabongkar jeung Eusi
Carefully remove the machine from its packaging. Retain all packaging materials for future transport or storage. Verify that all included components are present:
- Suku Serbaguna
- Sleting Foot
- Suku Kancing
- Lempeng Peringatan
- Pakét Jarum
- Bobbins
- Spool Pin Felts
- Obeng Pelat Jarum
- Sikat Jahitan / Sikat Lint
- Vinyl Dust Cover
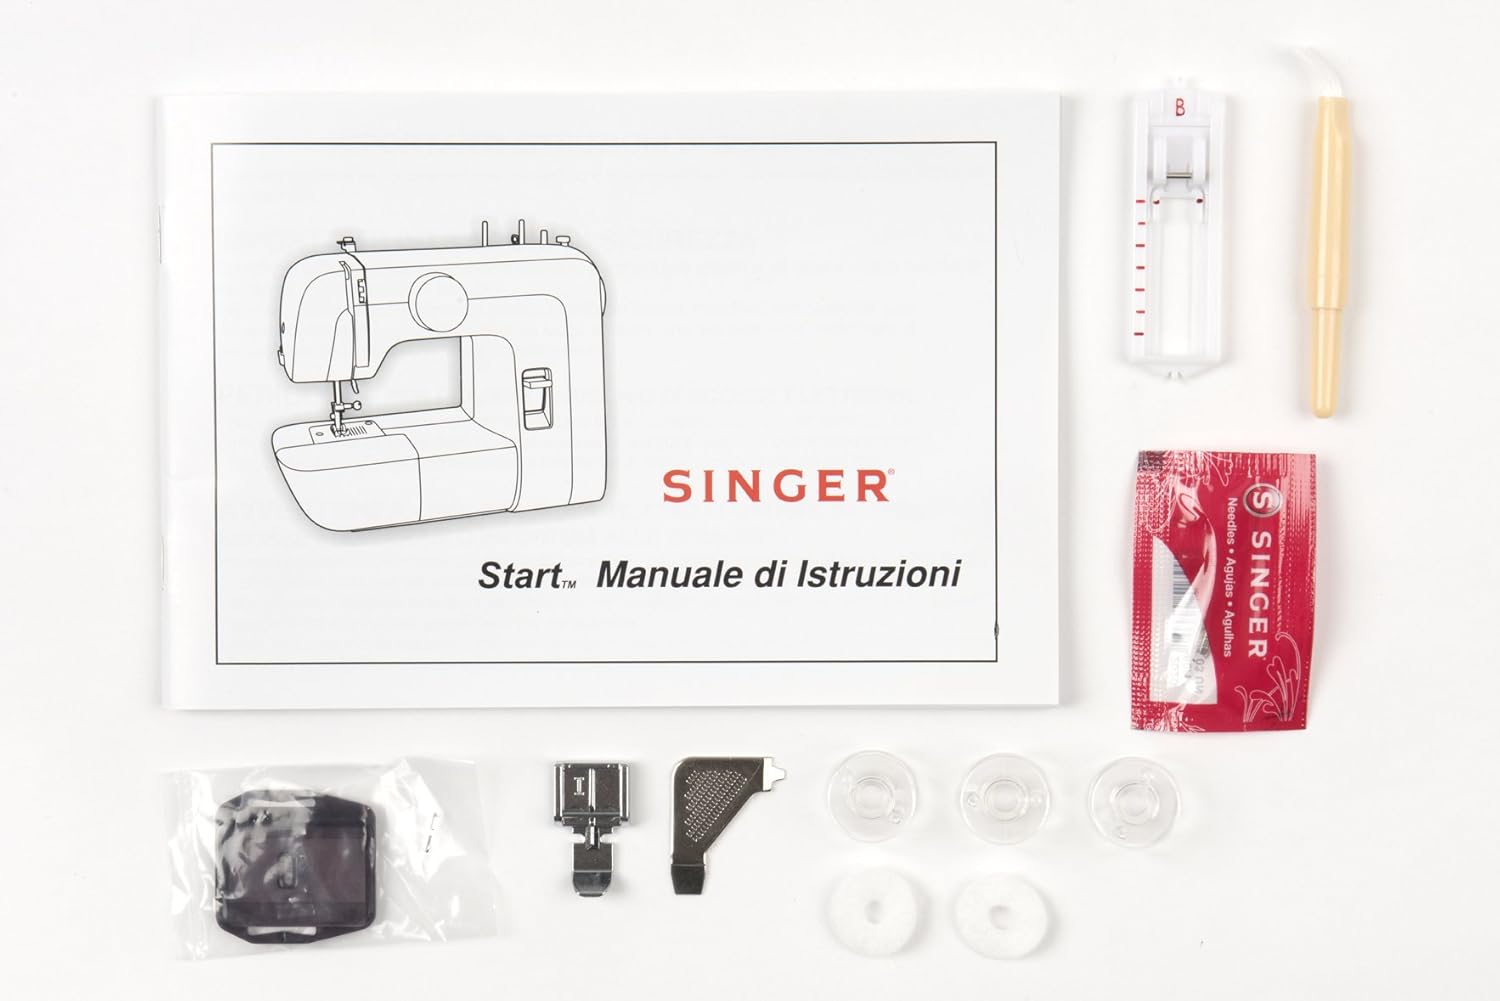
Image 3.1: Included accessories and instruction manual.
3.2 Sambungan Daya
Connect the power cord to the machine's power input socket and then plug it into a suitable electrical outlet (220V). Ensure the machine is switched off before connecting to power.

Gambar 3.2: Tukangeun view showing power input and foot pedal connection.
3.3 Threading Mesin
Correct threading is crucial for proper stitch formation.
3.3.1 Bobbin pungkal
- Pasang spool benang dina pin spool.
- Pituduh thread ngaliwatan pituduh thread luhur.
- Wrap the thread clockwise around the bobbin winding tension disc.
- Selapkeun benang ngaliwatan liang leutik dina bobin ti jero ka luar.
- Tempatkeun gulungan bobbin kana spindel penggulung bobbin teras dorong spindel ka katuhu.
- Hold the thread end and press the foot pedal. Wind a few turns, then trim the excess thread.
- Continue winding until the bobbin is full. The winder will stop automatically.
- Push the bobbin winder spindle to the left and remove the bobbin.
3.3.2 Nyelapkeun Bobbin
- Buka pelat panutup bobbin.
- Selapkeun bobbin tatu kana wadah bobbin kalawan benang unwinding counter-jarum jam.
- Guide the thread into the tension spring slot and pull it firmly until it snaps into place.
- Tutup piring panutup bobbin.
3.3.3 Upper Threading
- Angkat jarum ka posisi pangluhurna ngagunakeun roda leungeun.
- Ngangkat angkat alat presser.
- Pasang spool benang dina pin spool.
- Pituduh thread ngaliwatan pituduh thread luhur.
- Bring the thread down through the right channel, then up through the left channel, ensuring it passes through the take-up lever.
- Thread jarum ti hareup ka tukang.

Image 3.3: Illustration of the upper threading path.
3.4 Pamasangan jarum
To install or replace a needle:
- Hurungkeun roda leungeun pikeun ngangkat jarum ka posisi pangluhurna.
- Ngaleupaskeun jarum clamp sekrup.
- Cabut jarum heubeul.
- Lebetkeun jarum anyar kalayan sisi datar ngadep ka tukang mesin. Dorong ka luhur sajauh mungkin.
- Kencangkeun jarum clamp screw aman.

Image 3.4: Close-up of the needle and presser foot area.
4. Parentah Operasi
4.1 Pamilihan Jahitan
The SINGER Start 1306 offers 6 built-in stitch patterns. Turn the stitch selector dial to choose your desired stitch. The available stitches include 4 basic, 1 decorative, and 1 buttonhole stitch.

Image 4.1: Stitch selector dial with various stitch patterns.
4.2 Dasar Jahit
4.2.1 Starting a Seam
- Simpen lawon di handapeun suku presser, sejajarkeun ujungna ku pituduh kelim dina pelat jarum.
- Turunkeun suku presser.
- Hurungkeun handwheel pikeun nurunkeun jarum kana lawon di titik awal.
- Press the foot pedal gently to begin sewing.
4.2.2 Finishing a Seam
- Sew to the end of your seam.
- Press the reverse stitch lever to sew a few stitches backward to secure the seam.
- Angkat jarum ka posisi pangluhurna.
- Angkat suku presser.
- Pull the fabric away from the machine, then cut the threads using the thread cutter on the machine.
4.3 4-Step Buttonhole Function
The machine features a 4-step buttonhole function for creating buttonholes. Refer to the markings on the stitch selector dial for each step (1, 2, 3, 4). Use the buttonhole foot for best results.
4.4 Zipper Insertion
Attach the zipper foot to the machine. This foot allows you to sew close to the zipper teeth, ensuring a neat finish. Follow standard zipper insertion techniques, adjusting the needle position as needed.
4.5 Free Arm Usage
The removable free arm provides access to difficult-to-reach areas such as collars, sleeves, cuffs, and pant hems. To use, slide off the accessory storage compartment to expose the free arm.
5. Pangropéa
5.1 beberesih
beberesih biasa mantuan ngajaga kinerja mesin. Salawasna cabut colokan mesin saméméh beberesih.
- Ngaleungitkeun Lint: Use the provided lint brush to remove lint and dust from the bobbin area and feed dogs.
- Bersihan Luar: Lap beungeut luar ku lawon anu lemes sareng garing. Ulah nganggo bahan kimia anu keras atanapi pembersih anu abrasif.
5.2 Ngagantian jarum
Replace needles regularly, especially when sewing different fabric types or if the needle becomes bent or dull. A damaged needle can cause skipped stitches or fabric damage. Refer to section 3.4 for needle installation instructions.
6. Cara ngungkulan
Bagian ieu ngabahas masalah umum anu anjeun tingali. Pikeun masalah teu didaptarkeun di dieu, kontak rojongan customer.
| Masalah | Mungkin Cukang lantaranana | Solusi |
|---|---|---|
| Jahitan dilewatan | Jarum anu salah, jarum bengkok, benang anu henteu leres. | Replace needle, re-thread machine, ensure correct needle type for fabric. |
| Thread megatkeun | Incorrect threading, tension too tight, damaged needle, poor quality thread. | Re-thread, adjust tension, replace needle, use good quality thread. |
| Ngaganggu Benang Bobbin | Bobbin tatu teu bener, sisipan bobbin salah, lint dina wadah bobbin. | Putar deui gulungan bobin, pasang deui gulungan bobin kalayan leres, bersihan bagian bobin. |
| Mesin Teu Dimimitian | Power cord not connected, machine switched off, foot pedal not connected. | Check power connections, ensure switch is ON, connect foot pedal. |
7. Spésifikasi
| Fitur | Rincian |
|---|---|
| merek | panyanyi |
| Nomer modél | Mimitian 1306 |
| Item Beurat | 4.3 kg |
| Ukuran produk (L x W x H) | 35 x 18 x 29 cm |
| Voltage | 220V |
| Wattage | 70 Watt |
| Diwangun-di Jahitan | 6 (4 basic, 1 decorative, 1 buttonhole) |
| Jenis kancing | Otomatis 4 léngkah |
| Bahan Pigura | Logam Tugas Beurat |
| Komponén Kaasup | All Purpose Foot, Zipper Foot, Buttonhole Foot, Darning Plate, Pack of Needles, Bobbins, Spool Pin Felts, Needle Plate Screwdriver, Seam Ripper / Lint Brush, Vinyl Dust Cover |

Image 7.1: Product dimensions of the SINGER Start 1306 Sewing Machine.
8. Garansi jeung Rojongan
Your SINGER Start 1306 Sewing Machine comes with a manufacturer's warranty. Please refer to the warranty card included with your product for specific terms, conditions, and duration. For technical assistance, service, or to inquire about replacement parts, please contact SINGER customer support through their official websitus atanapi inpormasi kontak anu disayogikeun dina dokuméntasi jaminan anjeun.


