Bubuka
This manual provides detailed instructions for the installation, operation, and maintenance of your Venstar T1900 Residential Slimline Platinum Thermostat. Please read this manual thoroughly before attempting to install or operate the thermostat to ensure proper function and to avoid potential damage.
Émbaran Kasalametan penting
- Always turn off power to the heating/cooling system at the main circuit breaker or fuse box before installing or servicing the thermostat.
- Termostat ieu beroperasi dina tegangan AC 24 Volt. Ulah disambungkeun ka tegangan listriktage (120V atawa 240V).
- Pamasangan kedah dilakukeun ku teknisi anu mumpuni upami anjeun teu wawuh sareng kabel listrik.
- Do not short circuit the terminals on the gas valve or at the system control to test the thermostat. This will damage the thermostat and void the warranty.
- Ensure all wiring connections are secure and insulated to prevent short circuits.
Eusi pakét
Pariksa yén pakét anjeun ngandung barang-barang ieu:
- Unit Termostat Venstar T1900
- Pemasangan Hardware (screws sareng jangkar témbok)
- Manual pangguna (dokumén ieu)
Produk Leuwihview
The Venstar T1900 is a 7-day programmable digital thermostat designed for residential use. It offers precise temperature control and energy-saving scheduling capabilities. This thermostat is compatible with heat/cool, heat pump, and dual-fuel systems, controlling up to three heat stages jeung dua tiis stages.
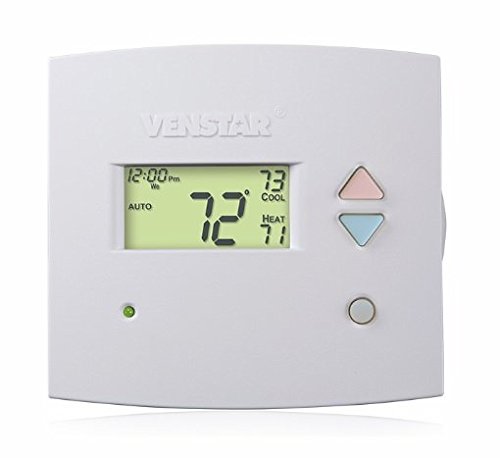
Gambar 1: Hareupeun view of the Venstar T1900 Thermostat. This image displays the thermostat's LCD screen and control buttons, indicating its slimline design.
Fitur konci:
- Programmability 7 dinten: Allows for customized heating and cooling schedules for each day of the week.
- Kasaluyuan Sistim: Works with heat/cool, dual-fuel, and heat pump systems.
- Multi-Stage Kontrol: Manages up to three heat stages jeung dua tiis stages.
- Kamampuhan Remote Control: Controllable by phone using an optional add-on (sold separately).
- Automatic or Manual Operation: Provides flexibility for scheduled or on-demand temperature adjustments.
Guide instalasi
Alat anu diperyogikeun:
- Obeng (Phillips jeung/atawa flathead)
- Bor nganggo mata bor anu cocog (upami masang jangkar témbok énggal)
- Striper kawat
- Pensil
- Tingkat (opsional)
1. Pareuman Kakuatan
Locate the circuit breaker or fuse box that controls your heating and cooling system. Turn off the power completely before proceeding with any wiring.
2. Remove Old Thermostat (if applicable)
- Cabut panutup termostat anjeun anu lami kalayan ati-ati.
- Candak gambar sambungan kabel anu tos aya kanggo rujukan.
- Label each wire with the terminal designation it was connected to (e.g., R, G, Y, W).
- Cabut kabelna teras cabut pelat pemasangan termostat anu lami tina témbok.
3. Gunung The New Thermostat Base
- Separate the front cover of the T1900 thermostat from its base plate.
- Position the base plate on the wall where you want to install the thermostat. Ensure it is level.
- Cirian liang ningkatna ku pensil.
- Bor liang pilot lamun perlu jeung selapkeun jangkar témbok.
- Secure the thermostat base plate to the wall using the provided screws.
4. Kabel
Connect the wires from your HVAC system to the corresponding terminals on the T1900 thermostat base. Refer to the wiring diagram provided with your specific HVAC system for precise connections. Ensure wires are stripped approximately 3/8 inch and securely fastened under the terminal screws.
Sebutan Terminal umum:
- R/Rc/Rh: 24V Power (Heating/Cooling)
- C: Common (24V return)
- G: Kipas angin
- Y/Y1: Kompresor Stage 1 (Tiiskeun)
- Y2: Kompresor Stage 2 (Tiiskeun)
- W/W1: Panas Stage 1 (Pemanasan)
- W2: Panas Stage 2 (Pemanasan)
- O / B: Reversing Valve (Heat Pumps)
Note: The T1900 supports various system types. Consult the detailed wiring diagrams in the full installation manual for specific configurations (e.g., heat pump with auxiliary heat, conventional multi-stage systems).
5. Gantelkeun Thermostat ka Base
Once wiring is complete and verified, carefully align the thermostat front cover with the mounted base plate and snap it into place.
6. Malikkeun Kakuatan
Return to your circuit breaker or fuse box and restore power to your heating and cooling system.
Setup Awal
Upon initial power-up, the thermostat may prompt you to configure basic settings. Follow the on-screen instructions to set the current date, time, and system type (e.g., Conventional, Heat Pump).
System Type Configuration:
It is crucial to correctly configure the thermostat for your specific HVAC system. Incorrect settings can lead to improper operation or damage. Access the installer settings menu (refer to the full installation guide for specific button sequences) to select:
- Tipe Sistim: Heat/Cool, Heat Pump, Dual Fuel
- Jumlah Panas Stages
- Jumlah Cool Stages
- Reversing Valve Operation: O (Cooling) or B (Heating)
Parentah Operasi
Ngartos tampilan:
The LCD screen displays the current temperature, set temperature, system mode, fan mode, time, and programming status. Refer to the icons and indicators on the screen for current operational status.
Setting System Mode:
Pencét éta MODÉ button to cycle through available system modes:
- PANAS: The system will operate to maintain the heating setpoint.
- Tiis: The system will operate to maintain the cooling setpoint.
- Otomatis: Termostat sacara otomatis ngalih antara pemanasan sareng pendinginan upami diperyogikeun pikeun ngajaga kisaran suhu anu disetel.
- Pareuman: Sistem pemanasan sareng penyejukan dipareuman.
Setting Fan Mode:
Pencét éta kipas angin tombol pikeun ngarobah modeu kipas:
- Otomatis: Kipas angin ngan ukur jalan nalika sistem pemanasan atanapi cooling aktip.
- ON: Kipasna terus hurung, henteu paduli kana paménta pemanasan atanapi pendinginan.
Nyaluyukeun Suhu:
Ngagunakeun éta UP jeung TURUN arrow buttons to adjust the desired temperature setpoint. In programmable modes, this will temporarily override the schedule until the next scheduled change.
Programming Schedules (7-Day):
The T1900 allows for 7-day programming, enabling different schedules for each day of the week. This feature helps save energy by adjusting temperatures when you are away or asleep.
- Pencét éta PROGRAM tombol pikeun ngasupkeun mode programming.
- Ngagunakeun éta POÉ button to select the day or group of days you wish to program (e.g., Mon-Fri, Sat-Sun, or individual days).
- Ngagunakeun éta WAKTU button to cycle through the four available periods: Wake, Leave, Return, Sleep.
- Ngagunakeun éta UP jeung TURUN arrow buttons to set the desired temperature for each period.
- Ngagunakeun éta TAHAN button to exit programming mode or save changes.
Refer to the detailed programming section in the full user guide for advanced options and specific button sequences.
Remote Control (Optional Add-on):
The Venstar T1900 thermostat can be controlled remotely via a phone using an optional add-on module (sold separately). This module connects to the thermostat and allows for remote access and control through a dedicated application. Installation and setup instructions for the remote control module are provided with the module itself.
Pangropéa
Cleaning the Thermostat:
To maintain the appearance and functionality of your thermostat, periodically wipe the exterior with a soft, damp cloth. Do not use abrasive cleaners, solvents, or chemical sprays, as these can damage the plastic and electronic components.
Ngagantian batré:
The Venstar T1900 thermostat does not require batteries for operation as it is powered by the 24V AC system.
Pamérésan masalah
If you experience issues with your Venstar T1900 thermostat, consult the following common problems and solutions:
| Masalah | Mungkin Cukang lantaranana | Solusi |
|---|---|---|
| Pintonan termostat kosong | Taya kakuatan ka thermostat. | Pariksa pemutus sirkuit pikeun sistem HVAC anjeun. Pastikeun sadaya sambungan kabel aman. |
| Heating/Cooling system does not respond | Incorrect system mode selected; wiring issue; system lockout. | Verify the system mode (HEAT/COOL/AUTO). Check wiring connections. Wait 5 minutes for system lockout to reset. |
| Maca suhu sigana teu akurat | Thermostat location; sensor obstruction. | Ensure the thermostat is not exposed to direct sunlight, drafts, or heat sources. Clean any dust from the thermostat vents. |
| Programming schedule is not working | Program not saved; temporary override active; incorrect time/day setting. | Ensure programs are saved. Check if a temporary override is active and cancel it. Verify current time and day settings. |
| Kipas terus-terusan jalan dina mode AUTO | Fan mode set to ON; wiring issue. | Press the FAN button to ensure it is set to AUTO. Check fan wiring. |
If these solutions do not resolve the issue, please contact customer support or a qualified HVAC technician.
spésifikasi
| Fitur | Spésifikasi |
|---|---|
| merek | Venstar |
| Ngaran modél | Venstar T1900 |
| Tipe Controller | Pencét Tombol |
| Fitur husus | Bisa diprogram |
| Warna | Bodas |
| Mangpaat husus Pikeun Produk | Heat Pump, Heater |
| Tipe Kontrol Suhu | Programmable, Smart/Remote (with add-on) |
| Voltage | 24 Volt AC |
| Tipe tampilan | LCD atawa LED |
| Métode kontrol | Remote (with add-on) |
| Lampu tukang | Sumuhun |
| Dimensi produk | 5.3 x 2 x 2 inci |
| Item Beurat | 0.01 ons |
| Batré Diperlukeun? | No |
Émbaran jaminan
Venstar products are manufactured to high-quality standards. This product is covered by a limited warranty against defects in materials and workmanship. The specific terms and duration of the warranty may vary. Please refer to the warranty card included with your product or visit the official Venstar websitus kanggo inpormasi garansi sareng prosedur pendaptaran anu lengkep.
Rojongan Palanggan
For technical assistance, troubleshooting, or warranty inquiries, please contact Venstar customer support. You can typically find contact information, including phone numbers and email addresses, on the official Venstar websitus (www.venstar.com) atanapi dina bungkus produk.
When contacting support, please have your thermostat model number (T1900) and any relevant purchase information ready.


