1. Bubuka
Thank you for choosing the LinQ PRO GO (A-S050C) Videocamera. This manual provides essential information for setting up, operating, and maintaining your device. Please read it carefully before use to ensure optimal performance and longevity of your camera.
The LinQ PRO GO (A-S050C) is a versatile action camera designed to capture high-definition videos and photos. It features a 2-inch HD LCD display, a 170-degree wide-angle fisheye lens, and a robust waterproof casing allowing submersion up to 30 meters. With its 12-megapixel sensor and Full HD 1080p video recording at 30fps, it is suitable for various outdoor activities and sports.
2. Eusi Paket
Punten parios yén sadaya barang anu didaptarkeun di handap kalebet kana pakét anjeun:
- LinQ PRO GO (A-S050C) Videocamera with Waterproof Housing
- Kabel Ngecas USB
- Adaptor kakuatan
- Batré Litium Rechargeable (900mAh)
- Various Mounting Accessories (e.g., helmet mounts, bicycle mounts, clips, straps)
- Kain beberesih

Gambar 2.1: LinQ PRO GO (A-S050C) Videocamera in its protective waterproof housing.
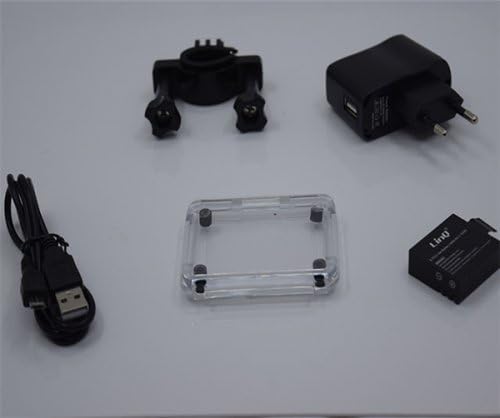
Gambar 2.2: Essential accessories including the USB cable, power adapter, rechargeable battery, and an additional frame for the waterproof housing.
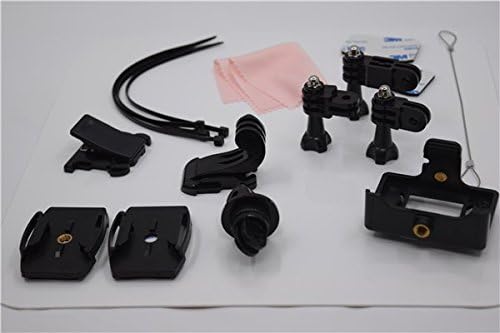
Gambar 2.3: A selection of mounting accessories, including clips, adhesive mounts, and straps, for attaching the camera to various surfaces and gear.
3. Setélan
3.1. Ngecas Batré
- Insert the provided 900mAh lithium battery into the camera's battery compartment.
- Sambungkeun kaméra kana adaptor daya nganggo kabel USB.
- Colokkeun adaptor daya kana stop kontak. Lampu indikator ngecas bakal hurung.
- Allow approximately 3 hours for a full charge. The indicator light will change or turn off once charging is complete. A fully charged battery provides approximately 90 minutes of recording at 1080p@30fps.
3.2. Inserting a Micro SD Card
The camera supports Micro SD cards up to 32GB. A Class 10 or higher speed rating is recommended for optimal video recording performance.
- Buka panutup slot kartu Micro SD anu aya di sisi kaméra.
- Selapkeun kartu Micro SD kalayan kontak emas nyanghareup ka tukang kaméra nepi ka clicks kana tempatna.
- Tutup panutup slot kartu aman.
- It is recommended to format the Micro SD card using the camera's settings menu before first use.
3.3. Powering on / Pareum
- To power on: Press and hold the Power/Mode button (usually on the front or top) for a few seconds until the screen illuminates.
- To power off: Press and hold the Power/Mode button again until the screen turns off.
4. Parentah Operasi
4.1. Operasi dasar
- Ngalihkeun Mode: Press the Power/Mode button briefly to cycle through different modes (Video, Photo, Playback, Settings).
- Tombol Rana/OK: Press the Shutter/OK button (usually on top) to start/stop recording video or to take a photo. In menu mode, this button confirms selections.
- Tombol Napigasi: Use the Up/Down buttons (if available, often on the side) to navigate through menu options or zoom in/out.
4.2. Ngarekam Pidéo
In Video mode, the camera can record at various resolutions:
- 1920x1080 (1080p) at 30fps
- 1280x720 (720p) at 60fps
- 848x480 (WVGA) at 30fps
- 640x480 (VGA) at 30fps
Press the Shutter/OK button once to start recording. A red indicator light or on-screen icon will typically flash. Press it again to stop recording.
4.3. Poto Capture
In Photo mode, the camera supports image resolutions up to 12 megapixels:
- 12M
- 10M
- 8M
- 5M
Press the Shutter/OK button once to take a photo.
4.4. Setélan Canggih
Access the settings menu to adjust various parameters:
- Setélan Pidéo: Loop recording, time-lapse, motion detection.
- Setélan Poto: Single shot, self-timer (5s/10s/20s), continuous shooting.
- Kakeunaan: Adjust EV compensation for brighter or darker images.
- Kasaimbangan bodas: Select appropriate white balance for different lighting conditions (Auto, Daylight, Cloudy, Tungsten, Fluorescent).
- ISO: Adjust light sensitivity.
- Seukeutna: Control image sharpness.
- Kaping/Waktu: Atur tanggal sareng waktos anu leres.
- Basa: Pilih basa anu anjeun pikaresep.
- Pormat Kartu SD: Erase all data on the Micro SD card.
4.5. Puterkeun deui
In Playback mode, you can review your captured videos and photos on the 1.5-inch LCD screen. Use the navigation buttons to scroll through files. Press the Shutter/OK button to play videos. Fast forward and rewind functions are supported for videos.
4.6. Nyambungkeun ka Komputer/TV
- Sambungan USB: Connect the camera to a computer using the USB cable. The camera will appear as a removable disk, allowing you to transfer files. It can also function as a webkaméra.
- Sambungan HDMI: Connect the camera to an HDMI-compatible display (e.g., TV) using an HDMI cable (not included) to view eusi Anjeun dina layar nu leuwih gede.
5. Pangropéa
- beberesih: Use the provided cleaning cloth or a soft, lint-free cloth to clean the camera lens and LCD screen. Do not use harsh chemicals or abrasive materials.
- Perumahan waterproof: Regularly inspect the waterproof housing for any cracks, damage, or debris on the O-ring seal. Ensure the O-ring is clean and properly seated before each use in water. Rinse the housing with fresh water after saltwater use and allow it to air dry.
- Panyimpenan: Simpen kaméra di tempat anu tiis sareng garing jauh tina sinar panonpoé langsung sareng suhu anu ekstrim. Cabut batré upami kaméra moal dianggo kanggo waktos anu panjang.
- Perawatan batré: Avoid fully discharging the battery frequently. Recharge the battery periodically even if not in use to maintain its health.
6. Cara ngungkulan
- Kaméra teu hurung: Pastikeun batréna tos dicas pinuh. Pasang deui batréna.
- Teu tiasa ngarékam pidéo/nyokot poto: Check if a Micro SD card is inserted and properly formatted. Ensure there is sufficient space on the card.
- Poor video/image quality: Ensure the lens is clean. Check the selected resolution settings. Ensure adequate lighting.
- Water leakage in housing: Immediately remove the camera from water. Inspect the waterproof housing for damage, ensure the O-ring is clean and correctly seated, and that all latches are securely closed.
- Kaméra beku: Press and hold the Power/Mode button for 10-15 seconds to force a shutdown. If the issue persists, remove and reinsert the battery.
7. Spésifikasi
| Fitur | Spésifikasi |
|---|---|
| Nomer modél | A-S050C (6970334022037) |
| tampilan | LCD HD 2 inci |
| Lensa | 170-degree Wide-Angle Fisheye, 6-glass lens |
| Chipset | Novatek 96650 + AR0330 |
| Resolusi Video | 1920x1080 (30fps), 1280x720 (60fps), 848x480 (30fps), 640x480 (30fps) |
| Format pidéo | MOV (H.264 compression) |
| Resolusi gambar | 12M / 10M / 8M / 5M |
| Format Gambar | JPG |
| Modeu Poto | Single Shot, Self-timer (5s/10s/20s), Continuous |
| Fungsi husus | Loop Recording, Time-lapse, Motion Detection, Dashcam/Webfungsi cam |
| Jero waterproof | Up to 30 meters (with waterproof housing) |
| Panyimpenan | Micro SD card, up to 32GB (Class 10 recommended) |
| Batré | 900mAh Rechargeable Lithium Batre |
| Kahirupan batré | Approx. 90 minutes (1080p@30fps) |
| Konektipitas | USB 2.0, HDMI |
| Diménsi | 59.2mm x 41mm x 29.8mm |
| Beurat | 60g |
8. Émbaran Hukum
This product is accompanied by a regular fiscal receipt for the cost of the product. If you require an invoice, please submit a request indicating all your details by sending a message through the 'Contact Seller' option. Warranty information should be obtained directly from your point of purchase or the seller.


