Bubuka
This manual provides comprehensive instructions for the assembly, operation, and maintenance of your ARROW 12' x 20' x 7' 29-Gauge Carport. Designed for durability and versatility, this carport offers robust protection for vehicles, boats, tractors, and serves as an excellent outdoor shelter for various activities.
Constructed with a galvanized steel roof and an industrial steel frame, it is built to withstand diverse weather conditions, featuring a wind speed rating of 100 MPH and a snow/ground load rating of up to 35 PSF.
Émbaran Kasalametan penting
Always follow the manufacturer's instructions for assembly, anchoring, and maintenance. This product is heavy and large; use caution when handling to avoid injury. Secure the shelter to a stable foundation to prevent it from moving in high winds or under heavy snow loads. Keep children and pets away from the shelter during assembly and disassembly.
Komponén Kaasup
Your ARROW Carport package includes the following:
- komponén pigura
- Panél hateup
- Kabéh hardware diperlukeun
- Manual instruksi (dokumen ieu)
Setup sareng Majelis
Assembly of the ARROW Carport is designed to be straightforward, but requires careful attention to detail and adherence to the steps outlined below. It is recommended to have at least two people for assembly.
Pakakas Diperlukeun
Ensure you have the following tools available before beginning assembly:
- Pita ukur
- Power drill with 5/16 nut driver
- 7/16 rengkuh
- Sledgehammer (for ground anchors)
- Pry bar or screwdriver (for panel alignment)
- Two tall ladders
- Sarung tangan sareng kacamata kaamanan
Léngkah Majelis
Hambalan 1: Base Frame Majelis
Begin by assembling the base frame components. Ensure all connections are secure and measurements are accurate as per the detailed instructions in your manual. Proper squaring of the base is critical for overall stability.

Gambar: Hiji leuwihview of the assembled base frame, showing the rectangular footprint of the carport.

Gambar: A close-up view of a base frame connection point, illustrating how the square steel tubes connect and are secured with bolts.
Step 2: Front/Rear Rib Assembly
Assemble the front and rear ribs, which form the arched roof structure. These ribs are identifiable by the "ARROW STORAGE PRODUCTS" logo plaque at their peak. Ensure these are correctly oriented and securely fastened.

Gambar: A view looking up at the interior of the carport roof, showing the curved steel ribs and the "ARROW STORAGE PRODUCTS" logo at the center peak.
Step 3: Middle Rib Assembly
Proceed with the middle ribs. These ribs do not feature the logo plaque. Connect them to the base frame, ensuring proper spacing and alignment with the front and rear ribs.
Steps 4-5: Assemble Frame
With the ribs assembled, connect them to form the complete frame of the carport. This step requires careful lifting and securing of the arched sections to the base. Ensure all connections are tight and stable.
Step 6: Square and Anchor Frame
Before installing roof panels, it is crucial to square the entire frame. Measure diagonally from corner to corner until both diagonal measurements are equal. Once squared, anchor the frame securely to the ground using appropriate anchoring methods for your terrain. Refer to the ShelterLogic Anchor Guide for best practices.

Image: Two individuals measuring the diagonal of the carport frame to ensure it is square before permanent anchoring.
Step 7: First Roof Panel Assembly
Install the first roof panel. It is critical to ensure this panel is perfectly centered on the frame to ensure proper alignment for subsequent panels. Wear safety gloves to protect against sharp edges.
Image: A person wearing red gloves installing a roof panel, with a caution graphic for sharp edges. The image highlights the importance of centering the first panel.
Step 8: Assemble 2nd Roof Panel
Continue by assembling the second roof panel. Apply foam tape before overlaying the next panel to help seal the roof panels and prevent leaks. Ensure proper overlap as per the manual's diagrams.
Step 9: Assemble 3rd Roof Panel
Proceed with the third roof panel, following the same procedure of applying foam tape and ensuring correct overlap.
Steps 10-12: Assemble Remaining Roof Panels
Install the remaining roof panels one horizontal row at a time. Make sure to slide new panels under the installed ones to maintain proper water shedding. Continue until all roof panels are securely fastened.
Step 13: Install Edge Trim
Once all main roof panels are in place, install the edge trim along the sides of the carport. This provides a finished look and additional protection.
Assembly Assistance Videos
Pidéo Majelis Resmi
Video: A detailed assembly video for the Arrow Carport, demonstrating each step from base frame setup to roof panel installation. This video is provided by the merchant to assist with the assembly process.
3D Interactive Instructions (BILT App)
For an enhanced assembly experience, download the BILT app. This app provides interactive 3D instructions, allowing you to rotate images, zoom in on parts, and receive voice and text guidance for each step. Scan the QR code below or visit your app store to download.

Image: A smartphone screen displaying the BILT app with 3D assembly instructions for the carport, alongside QR codes for App Store and Google Play downloads.
Video: An instructional 3D video demonstrating the interactive features of the BILT app for assembling the carport. This video highlights the ability to rotate, zoom, and follow step-by-step guidance.
Operasi sarta pamakéan
The ARROW Carport is a versatile outdoor shelter designed for multiple uses:
- Panyimpenan Kandaraan: Provides protection for cars, trucks, boats, and ATVs from sun, rain, and snow.
- Equipment Shelter: Ideal for storing tractors, lawnmowers, and other outdoor equipment.
- Outdoor Living Space: Can be used as a shaded area for picnics, outdoor gatherings, or as a temporary workspace.
The carport is rated for a wind speed of 100 MPH and a snow/ground load of up to 35 PSF, offering reliable protection in various weather conditions.

Image: A red pickup truck parked under the carport, demonstrating its use for vehicle protection.

Image: The carport set up as an outdoor picnic area with a table, chairs, and a grill, showcasing versatility na.

Image: A graphic illustrating the carport's wind rating of up to 100 MPH and snow rating of up to 35 PSF, emphasizing its weather resistance.
Pangropéa
Regular maintenance will extend the life and appearance of your ARROW Carport:
- Inspeksi rutin: Periodically check all bolts, screws, and anchors to ensure they remain tight and secure. Re-tighten as necessary.
- beberesih: Clean the roof panels and frame regularly with mild soap and water to prevent dirt and debris buildup. Avoid abrasive cleaners or tools that could scratch the finish.
- Ngaleungitkeun salju: In areas with heavy snowfall, regularly remove accumulated snow from the roof to prevent excessive load and potential damage, especially if snow loads exceed the rated 35 PSF.
- Pariksa korosi: Inspect the galvanized steel components for any signs of corrosion or rust. Address any issues promptly with appropriate rust-inhibiting treatments.
Pamérésan masalah
Here are solutions to common issues encountered during assembly or use:
Issue: Difficulty with Assembly / Holes Not Lining Up
Solusi: Ensure the base frame is perfectly square before proceeding with rib and panel installation. Even slight inaccuracies in the base can cause significant alignment issues later. Use a tape measure to check diagonal measurements of the base frame and adjust until they are equal. Having a second person to assist with alignment and lifting is highly recommended. A pry bar or screwdriver can help gently align holes if they are slightly off.
Issue: Roof Leaks After Assembly
Solusi: Leaks often occur due to improper panel overlap or insufficient sealing. Re-check that all roof panels are correctly overlapped, with the upper panel covering the lower one in each row. Ensure foam tape (if included or recommended) is properly applied along all seams before fastening. Tighten all roof panel screws to ensure a snug fit, but do not overtighten.
Issue: Carport Instability in High Winds or Heavy Snow
Solusi: Verify that the carport is securely anchored to the ground using appropriate anchors for your soil type. For extreme weather conditions, consider additional anchoring methods or temporary disassembly if possible. Regularly clear snow accumulation to prevent exceeding the 35 PSF snow load rating. The carport is designed for its rated limits; exceeding these limits can compromise its structural integrity.
Spésifikasi produk
| Atribut | Rincian |
|---|---|
| merek | Panah |
| Nomer modél | CPH122007 |
| Bahan | Galvanized Steel (Roof), Alloy Steel (Frame) |
| Warna | Cangkang endog |
| Ukuran produk (L x W x H) | 237"L x 146"W x 102"H (19'9"L x 12'2"W x 8'6"H) |
| Item Beurat | 572 pon (260 Kilogram) |
| Dianjurkeun Mangpaat | Picnic, Outdoor Activities, Vehicle Storage |
| UV Light Protection | Leres |
| Tingkat Résistansi Cai | Tahan cai |
| Majelis Diperlukeun | Sumuhun |
| Angin Peunteun Speed | 100 mph |
| Snow/Ground Load Rating | 35 PSF |
| UPC | 026862110060 |
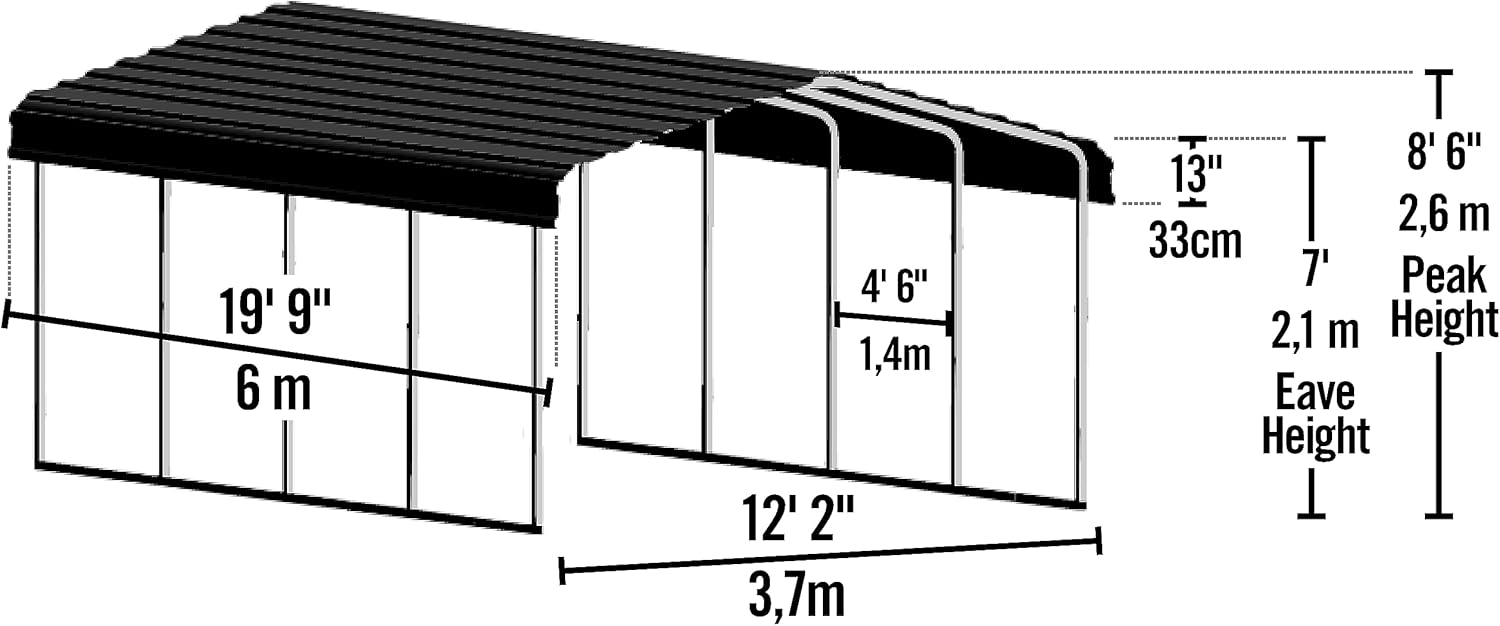
Image: A diagram illustrating the key dimensions of the carport, including length, width, and peak height.

Image: A detailed diagram highlighting various features of the carport, such as the galvanized steel roof, industrial grade steel frame, and slip-fit frame connection.
Garansi sareng Rojongan
Arrow Storage Products stands behind the quality of its products.
- Garansi: This product is covered by a 10-Year Limited Warranty. Please retain your proof of purchase for warranty claims.
- Rojongan Palanggan: Support is available 7 days a week. For questions, warranty information, online manuals, or how-to videos, please refer to the contact information provided with your product or visit the official Arrow Storage Products websitus.
Image: A graphic highlighting Arrow Storage Products' 10-year limited warranty and 7-day a week customer support availability.


