Bubuka
This manual provides detailed instructions for the installation, setup, and operation of your JVC KD-X260BT Digital Media Receiver. This unit is designed to provide high-quality audio playback and hands-free communication in your vehicle, featuring Bluetooth connectivity, USB input, and a 13-band equalizer. Please note, this unit does not play CDs. Read this manual thoroughly before use to ensure proper operation and to prevent damage.

Gambar: Hareupeun view of the JVC KD-X260BT Digital Media Receiver, showing the display and control buttons.
Émbaran Kasalametan
- Do not operate the unit in a way that distracts you from driving. Always keep your attention on the road.
- Pastikeun sambungan kabel anu leres pikeun nyegah korsleting atanapi karusakan kana sistem listrik kendaraan.
- Hindarkeun ngalaan unit ka lembab atanapi suhu anu ekstrim.
- Entong nyobian ngabongkar atanapi ngarobih unit. Rujuk sadayana jasa ka tanaga anu mumpuni.
- Use only accessories specified by JVC.
Eusi pakét
Pastikeun yén sadaya item aya dina bungkusan:
- JVC KD-X260BT Digital Media Panarima
- Diiringkeun kabel
- External Wired Microphone
- Pamasangan Hardware
- Manual Pitunjuk (dokumén ieu)
Pamasangan
Professional installation is recommended for this product. Incorrect installation can lead to damage to the unit or vehicle. The KD-X260BT features a short body design, which facilitates easier installation in various vehicle dashboards.
Sambungan Wiring:
- Connect the wiring harness according to your vehicle's wiring diagram.
- Pastikeun sadaya sambungan aman sareng insulated pikeun nyegah sirkuit pondok.
- Connect the external microphone to the designated input for hands-free calling. Position the microphone in a location that provides clear voice pickup.
- Sambungkeun kabel anteneu.
- Upami nganggo jaba amplifiers, connect the 2.5V preamp outputs (rear/subwoofer selectable).
Pamasangan:
- Install the mounting sleeve into the dashboard opening.
- Slide the receiver into the mounting sleeve until it locks into place.
- Gantelkeun cingcin motong.
Disetél
Daya mimiti Hurung:
After installation, turn on your vehicle's ignition. The unit should power on. Follow any on-screen prompts for initial setup, such as language selection.
Masangkeun Bluetooth:
The KD-X260BT supports Bluetooth 3.0+EDR and allows for two phones to be connected full-time. This enables receiving calls from either phone with a push of a key.
- On the receiver, navigate to the Bluetooth menu.
- Select "Pairing" or "Device Search".
- Dina smartphone anjeun, aktipkeun Bluetooth sareng milarian alat anu sayogi.
- Select "KD-X260BT" from the list on your phone.
- Pastikeun kode papasangan dina kadua alat upami dipenta.
- Once paired, the unit will display a confirmation.
The unit supports Bluetooth profiles HFP (Hands-Free Profile 1.6 for wideband speech), HSP (Headset Profile), PBAP (Phone Book Access Profile), A2DP (Advanced Audio Distribution Profile), jeung AVRCP (Audio/Video Remote Control Profile 1.5).
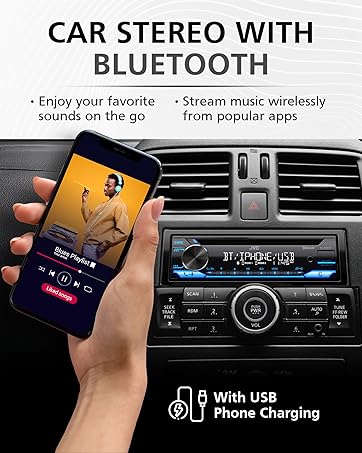
Image: JVC KD-X260BT display indicating Bluetooth connection, with a smartphone showing music playback, illustrating wireless audio streaming.
JVC Remote App:
Download the "JVC Remote" app (available for iOS and Android) to control the receiver's source directly from your smartphone using simple finger gestures.
Parentah Operasi
Kontrol dasar:
- Tombol Daya: Pencét pikeun ngahurungkeun / mareuman unit.
- Jilid Kenop: Rotate to adjust the volume level. Press to access menu options.
- Tombol Sumber: Press to cycle through available audio sources (Tuner, USB, Bluetooth Audio, AUX).
- Tombol tampilan: Changes display information (e.g., clock, track title).
Radio Tuner:
- Press the Source button to select "Tuner" (AM/FM).
- Anggo tombol milarian pikeun milarian stasiun radio.
- Press and hold a preset button (1-6) to store a station.
Puterkeun USB:
Connect a USB device to the front USB port. The unit supports MP3/WMA/WAV/FLAC playback. The USB port also provides high current 1.5A charging for smartphones.
- Insert the USB device. The unit will automatically switch to USB source and begin playback.
- Use the track buttons to skip tracks.
- Use the folder buttons to navigate through folders.
- ID3 MP3 Tag Display (title/artist/album) is supported.
- Android music playback (AOA 2.0) is supported for Android phones (version 4.1 or later).
Streaming Audio Bluetooth:
Once a Bluetooth device is paired, select "Bluetooth Audio" as the source to stream music wirelessly. Use the receiver's controls or the paired device to manage playback (play, pause, skip, search via AVRCP 1.5).
Telepon Hand-Free:
When a call comes in on a paired phone, the unit will display the caller ID. Press the call button to answer, and the end call button to hang up. The external microphone ensures clear communication.
Audio Settings (Equalizer):
The unit features a 13-Band Graphic Equalizer with 10 preset EQ settings and 1 user-customizable setting. Access the audio menu to adjust:
- Ékualiser: Select from preset curves or customize your own.
- Nguatkeun Bass: Ningkatkeun frékuénsi handap.
- Kaseueuran: Compensates for perceived loss of bass and treble at low volumes.
- Kasaimbangan / Fader: Adjusts sound distribution between left/right and front/rear speakers.
- Kontrol Subwoofer: Adjust subwoofer output level and frequency if connected.
Internet Radio/Digital Radio Control:
Control Pandora, iHeartRadio, and Spotify directly from the receiver when connected to a compatible Android device via Bluetooth.
Steering Wheel Remote Control:
Factory steering wheel control functions can be retained with a third-party adapter (sold separately).
Pangropéa
- Ngabersihan Unit: Anggo kaén anu lembut sareng garing pikeun ngusap panel hareup. Ulah make cleaners abrasive atawa pangleyur.
- Port USB: Tetep port USB bébas tina lebu jeung lebu.
- Pembaruan firmware: Pariksa JVC-na website periodically for any available firmware updates for improved performance and features.
Pamérésan masalah
| Masalah | Solusi |
|---|---|
| Taya kakuatan | Check vehicle's fuse. Ensure wiring harness is correctly connected. |
| Taya sora | Check speaker connections. Verify volume level. Ensure correct source is selected. |
| Bluetooth teu nyambung | Ensure Bluetooth is enabled on both devices. Delete previous pairing and re-pair. Move devices closer. |
| alat USB teu dipikawanoh | Ensure USB device is formatted correctly (FAT16/32). Check for compatible file types. Try a different USB device. |
| panarimaan radio goréng | Check antenna connection. Ensure antenna is fully extended (if applicable). |
spésifikasi
| Fitur | Rincian |
|---|---|
| Nomer modél | KD-X260BT |
| Kaluaran Daya (Puncak) | 50 Watts x 4 Saluran |
| Kaluaran Kakuatan (RMS) | 22 Watts x 4 Saluran |
| tampilan | VA LCD Display, Spanish Text Display |
| Input USB | Front USB, 1.5A Charging, MP3/WMA/WAV/FLAC Playback, Android AOA 2.0 |
| Input bantu | 3.5mm Front Audio Auxiliary Input |
| Vérsi Bluetooth | 3.0+EDR Certified |
| Bluetooth Profiles | HFP 1.6, HSP, PBAP, A2DP, AVRCP 1.5 |
| Ékualiser | 13-Band Graphic Equalizer (10 Preset x 1 User) |
| Praamp Kaluaran | 1 Set of 2.5V (Rear/Subwoofer Selectable) |
| Internet Radio Control | Pandora, Spotify, iHeartRadio (for Android) |
| Dimensi (Produk) | 4 x 9 x 8 inci |
| Item Beurat | 1.79 pon |
Garansi sareng Rojongan
This JVC KD-X260BT Digital Media Receiver comes with a 1-Year Manufacturer's Warranty. For warranty claims, technical support, or service inquiries, please contact JVC customer support or visit the official JVC websitus. Simpen bukti pameseran anjeun pikeun validasi jaminan.
JVC Customer Support: Refer to the contact information provided with your product packaging or on the official JVC websitus.


