1. Bubuka
Hatur nuhun pikeun meuliasing the American Audio WM-419 4-Channel UHF Handheld Wireless Microphone System. This system is designed to provide high-quality, reliable wireless audio for various applications, including PA systems, karaoke, mobile entertainment, schools, and houses of worship. This manual provides essential information for the proper setup, operation, and maintenance of your WM-419 system.
Please read this manual thoroughly before operating the unit to ensure optimal performance and to prevent damage.
2. Eusi Paket
Pastikeun yén sadaya komponén anu didaptarkeun di handap kalebet kana pakét anjeun:
- 1 x WM-419 Wireless Receiver Unit
- 4 x Handheld Wireless Microphones
- 4 x Microphone Clips
- 8 x Batré AA (pikeun mikropon)
- 1 x Adaptor Daya pikeun Panarima
- 1 x 1/4" Audio Cable
- Manual pangguna (dokumén ieu)
Gambar 2.1: Included components of the WM-419 system. This image displays the receiver, four handheld microphones, four detachable antennas, eight AA batteries, a power adapter, and a 1/4" audio cable, along with four microphone clips.
3. Fitur konci
- 4-Channel UHF Wireless Handheld Microphone System
- Intelligent Frequency Autoscan with IR Synchronization
- Individual Volume Control for each microphone channel on the receiver
- XLR Audio Output for each microphone channel
- 50 Channels Available per Receiver (200 total channels)
- 16-Bit Pilot Technology to assist with eliminating frequency interference
- Wireless Range: Up to 300 feet / 90 meters (line of sight)
- Microphone Battery Life: 6-10 hours (with included AA batteries)
- OLED Screen on Handheld MIC Transmitters
4. Setup Guide
4.1 Receiver Placement
Place the WM-419 receiver on a stable, flat surface, away from strong electromagnetic interference sources. Ensure there is adequate ventilation around the unit. For optimal signal reception, position the receiver's antennas vertically and ensure they are not obstructed.

Gambar 4.1: Hareupeun view of the WM-419 receiver with microphones. This image shows the receiver unit with its four antennas extended, and the four handheld microphones resting on top, illustrating the compact design.
4.2 Nyambungkeun panarima
- Sambungan Daya: Connect the included power adapter to the DC 12-15V input on the rear panel of the receiver. Plug the adapter into a suitable power outlet.
- Kaluaran Audio: Connect the receiver to your PA system, mixer, or amplifier using the XLR audio outputs for individual microphone channels (Balanced A, B, C, D) or the AF MIX OUT (1/4" unbalanced) for a combined output.

Gambar 4.2: Rear panel connections of the WM-419 receiver. This image highlights the DC power input, four balanced XLR outputs (A, B, C, D), and a mixed 1/4" audio output, along with the antenna connections.
4.3 Masang Batré dina Mikropon
Each handheld microphone requires two AA batteries. Ensure correct polarity when inserting the batteries.
- Unscrew the bottom cap of the microphone to reveal the battery compartment.
- Insert two AA batteries, observing the polarity markings (+/-).
- Pasangkeun deui tutup handap kalayan pageuh.

Gambar 4.3: Four handheld microphones. This image displays the four individual handheld microphones, each featuring an OLED display and power button, ready for battery installation and use.
5. Parentah Operasi
5.1 Powering on / Pareum
- panarima: Press the POWER button on the front panel of the receiver to turn it on or off.
- Mikropon: Press and hold the power button on each handheld microphone for a few seconds to turn it on or off. The OLED screen will illuminate when powered on.
5.2 Frequency Synchronization (IR Sync)
The WM-419 features Intelligent Frequency Autoscan and IR Synchronization for easy setup.
- Turn on the receiver and the desired microphone.
- On the receiver, press the SCAN button for the channel you wish to set. The receiver will automatically scan for an available clear frequency.
- Once a frequency is found, the display will show "SYNC". Position the IR window of the microphone (usually near the bottom of the display) close to the IR sensor on the receiver (located near the channel display).
- Pencét éta SET button on the receiver for that channel. The frequency information will be transmitted to the microphone via infrared. The microphone's display should show the same frequency as the receiver, indicating successful synchronization.
- Repeat this process for each microphone.

Gambar 5.1: Receiver front panel detail. This image provides a close-up view of the receiver's illuminated OLED displays for each channel, showing frequency information, signal strength, and individual volume controls.

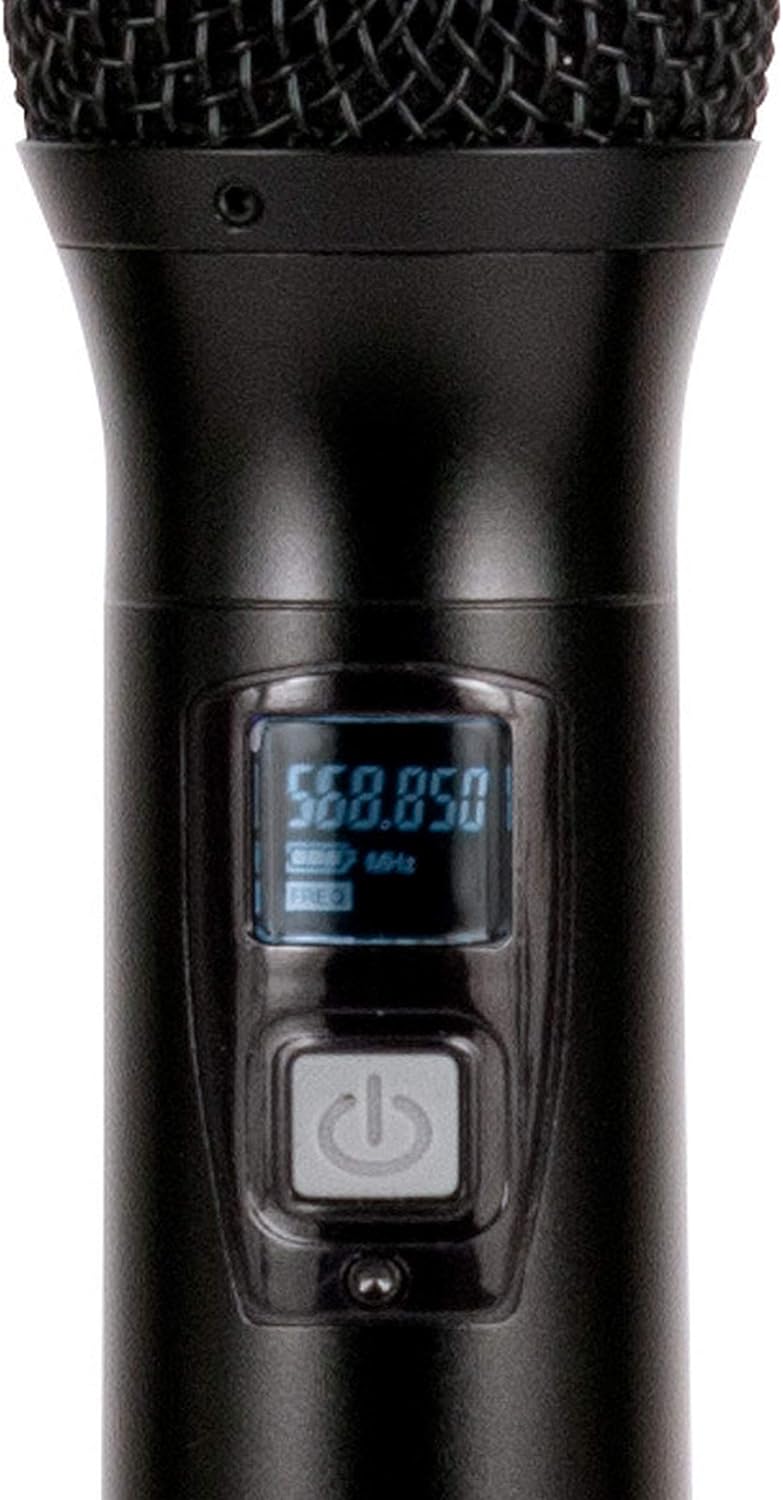
Gambar 5.2: Microphone OLED display. A detailed view of one handheld microphone's OLED screen, showing the current frequency and battery indicator, along with the power/mute button.
5.3 Nyaluyukeun Volume
Each channel on the receiver has an independent volume control knob. Adjust these knobs to achieve the desired audio level for each microphone.
5.4 Muting Microphones
A short press of the power button on the handheld microphone will mute/unmute the microphone. The OLED display will indicate the mute status.
6. Pangropéa
- beberesih: Use a soft, dry cloth to clean the surfaces of the receiver and microphones. Do not use abrasive cleaners or solvents.
- Ngagantian batré: Replace microphone batteries when the low battery indicator appears on the microphone's OLED screen or when audio quality degrades. Always use fresh AA batteries.
- Panyimpenan: When not in use for extended periods, remove batteries from the microphones to prevent leakage. Store the system in a cool, dry place.
7. Cara ngungkulan
| Masalah | Mungkin Cukang lantaranana | Solusi |
|---|---|---|
| Taya sora tina mikropon | Microphone not powered on; Batteries dead; Microphone not synchronized; Receiver volume too low; Output cable disconnected. | Ensure microphone is on; Replace batteries; Perform IR sync; Increase receiver channel volume; Check audio cable connections to mixer/PA. |
| Interference/Static | Nearby electronic devices; Other wireless systems on same frequency; Obstructions between mic and receiver; Receiver too far from microphone. | Move receiver away from interference sources; Perform Autoscan and re-sync to a clear frequency; Ensure line of sight; Reduce distance between mic and receiver. |
| rentang nirkabel pondok | Antennas not properly positioned; Obstructions; Low microphone battery. | Ensure antennas are vertical and unobstructed; Minimize physical barriers; Replace microphone batteries. |
| Layar mikropon teu tiasa dianggo | Batréna béak; Mikropon teu hurung. | Replace batteries; Press and hold power button to turn on. |
8. Spésifikasi
| Fitur | Rincian |
|---|---|
| Ngaran modél | American Audio WM-419 |
| Faktor Bentuk Mikropon | Microphone System (Handheld) |
| Jumlah Saluran | 4 (50 channels available per receiver, 200 total) |
| Téhnologi konektipitas | UHF Wireless, XLR |
| Sumber Daya | Receiver: AC Adapter; Microphones: 2 x AA Batteries (per mic) |
| Battery Life (Microphones) | 6-10 jam |
| Range nirkabel | Up to 300 feet / 90 meters (line of sight) |
| Rasio Signal-to-Noise | 70 dB |
| Tingkat Noise | 85 dB |
| Diménsi Produk (Panarima) | 22 x 14 x 6 inci |
| Item Beurat | 9 pon |
| Warna | Hideung |
| Alat nu cocog | PA System, Karaoke Machine |
| Fitur husus | Volume Control (individual channel) |
| Pola Polar | Saarah |
9. Garansi jeung Rojongan
For warranty information and technical support, please contact ADJ Products directly or visit their official websitus. Simpen resi pameseran anjeun salaku bukti pameseran pikeun klaim garansi.
Pabrikan: Produk ADJ
merek: ADJ
Websitus: www.adj.com
10. Émbaran Kasalametan
PERHATOSAN: Produk ieu tiasa ngalaan anjeun zat kimia kalebet timah, anu dipikaterang ku Nagara California anu nyababkeun kanker sareng cacat lahir atanapi cilaka réproduktif sanés. Kanggo inpormasi salengkepna buka www.P65Warnings.ca.gov.
- Ulah ngalaan unit ka hujan atawa Uap.
- Ulah nyabut panutupna. Teu aya bagian anu tiasa diservis ku pangguna di jero. Serahkan servis ka tanaga anu mumpuni.
- Pastikeun ventilasi anu leres. Ulah meungpeuk bukaan ventilasi.
- Paké ngan adaptor kakuatan disadiakeun kalawan unit.
- Buang batré sacara tanggung jawab nurutkeun peraturan lokal.


