Bubuka
Hatur nuhun pikeun meuliasing the Trexonic Retro Record Player. This versatile audio system combines vintage aesthetics with modern functionality, allowing you to enjoy your favorite music from various sources including vinyl records, CDs, Bluetooth devices, and AM/FM radio. This manual provides detailed instructions for setup, operation, maintenance, and troubleshooting to ensure optimal performance and longevity of your device.
Precautions Kasalametan penting
Please read these instructions carefully before using the unit. Keep this manual for future reference.
- Sumber Daya: Pastikeun catu daya cocog sareng voltage dieusian dina unit.
- Ventilasi: Ulah meungpeuk bukaan ventilasi. Ngidinan spasi nyukupan sabudeureun unit pikeun aliran hawa ditangtoskeun.
- Cai sareng Uap: Do not expose the unit to rain, moisture, or dripping water. Do not place objects filled with liquids on the unit.
- Panas: Jauhkeun unit tina sumber panas sapertos radiator, registers panas, kompor, atanapi aparat sanésna anu ngahasilkeun panas.
- beberesih: Cabut colokan unit tina stopkontak sateuacan beberesih. Paké lawon lemes, garing. Ulah make cleaners cair atawa cleaners aerosol.
- Palayanan: Entong nyobian ngalayanan produk ieu nyalira. Rujuk sadayana ngalayanan ka tanaga jasa anu mumpuni.
Eusi pakét
Pastikeun yén sadaya item kalebet dina pakét:
- Trexonic Retro Record Player (TRX-16TRQ)
- Adaptor kakuatan
- Manual pangguna (dokumén ieu)
Produk Leuwihview
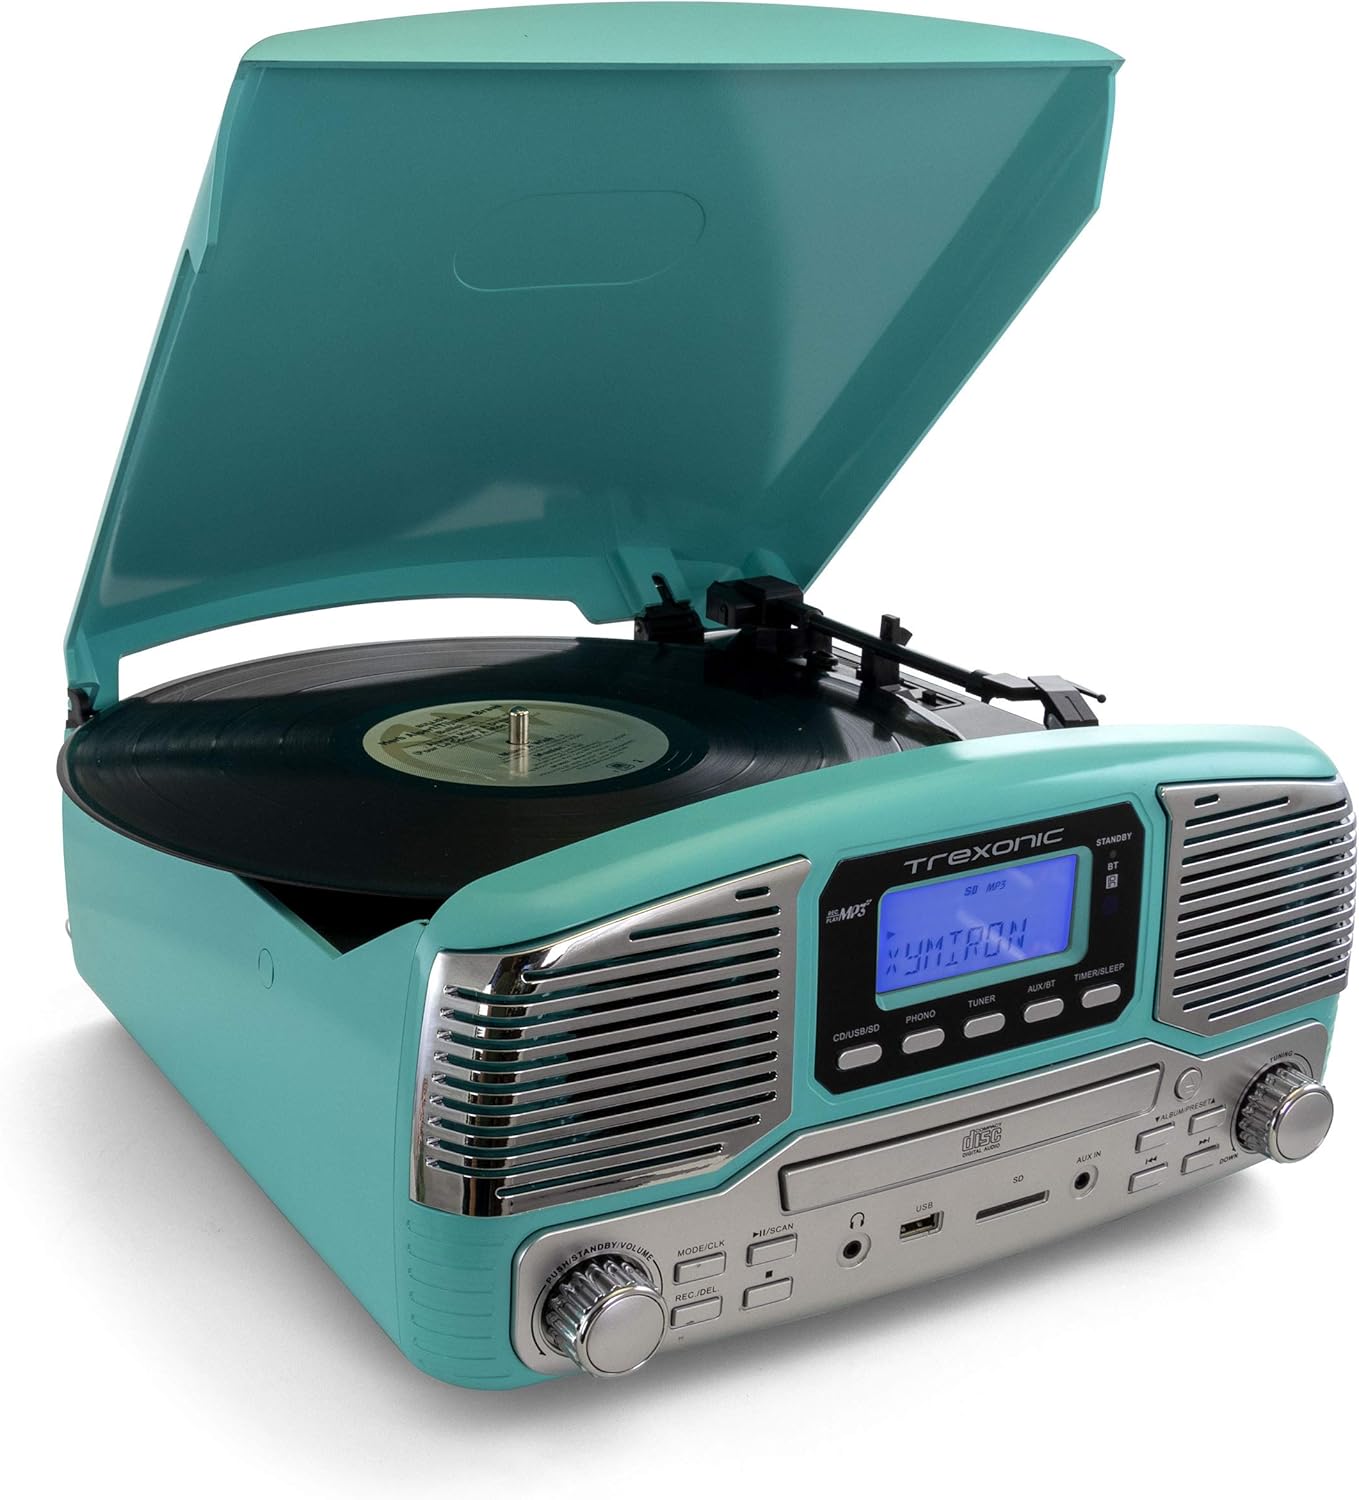
Familiarize yourself with the various components and controls of your Trexonic Retro Record Player.

Gambar: Hareupeun view of the Trexonic Retro Record Player (Model TRX-16TRQ) highlighting key features. From left to right, the image points out the Headphone jack, USB input, SD input, CD Player, Aux-In, 3-Speed Turntable, FM/AM Radio, Bluetooth, and Alarm Clock with timer. The main display shows "READING".

Gambar: A detailed close-up of the control panel of the Trexonic Retro Record Player. The display shows "USB READING". Buttons visible include MODE/CLK, Play/Pause/Scan, REC/DEL, CD/USB/SD, PHONO, TUNER, AUX/BT, TIMER/SLEEP, and volume/tuning knobs.
Kontrol Panel hareup:
- MODE/CLK Knob: Controls power, volume, and clock settings.
- Play/Pause/Scan Button: Controls playback for CD/USB/SD, and scanning for radio.
- REC/DEL Button: Initiates recording to USB/SD or deletes files.
- CD/USB/SD Button: Selects CD, USB, or SD card input mode.
- PHONO Button: Selects turntable input mode.
- Tombol TUNER: Selects AM/FM radio mode.
- Tombol AUX/BT: Selects Auxiliary input or Bluetooth mode.
- TIMER/SLEEP Button: Sets alarm and sleep timer functions.
- Kenop Tuning: Nyaluyukeun frékuénsi radio.
- Jack headphone: Pikeun déngékeun pribadi.
- Port USB: Pikeun muterkeun sareng ngarékam drive USB.
- Slot Kartu SD: For SD card playback and recording.
- Soket Aux-In: Pikeun nyambungkeun alat audio éksternal.
- Baki CD: Pikeun nyelapkeun CD audio.
Sambungan Panel Belakang:
- Input Daya AC: Sambungkeun adaptor kakuatan di dieu.
- Jalur Kaluar RCA: Connect to external speakers or amplifier (cables not included).
Disetél
Unpacking sareng Penempatan:
- Sacara saksama piceun unit tina bungkusanna.
- Simpen unit dina permukaan anu datar sareng stabil, jauh tina sinar panonpoé langsung, sumber panas, sareng lebu atanapi kalembaban anu kaleuleuwihi.
- Pastikeun aya ventilasi anu cekap di sakitar unit.
Sambungan Daya:
- Connect the provided AC power adapter to the AC Power Input jack on the rear of the unit.
- Colokkeun tungtung adaptor daya anu sanésna kana stop kontak témbok standar.
- Unit bakal asup kana mode standby.
Daya mimiti Hurung:
To turn on the unit from standby mode, press the MODÉ/CLK knob or use the remote control (if included).
Parentah Operasi
Playing Vinyl Records:
Gambar: The Trexonic Retro Record Player in turquoise, with its lid open, showing a black vinyl record spinning on the turntable. The tone arm with its stylus is positioned on the record.
- Buka panutup lebu.
- Teundeun catetan vinyl dina piring turntable.
- Select the appropriate speed (33 1/3, 45, or 78 RPM) using the speed selector switch located on the turntable deck. For 45 RPM records, place the included 45 RPM adapter on the center spindle.
- Pencét éta TELEPON button to select the turntable mode.
- Angkat leungeun nada lalaunan nganggo tuas isyarat teras posisikeun stylus di luhur trek rékaman anu dipikahoyong.
- Lower the tone arm slowly onto the record using the cue lever. Playback will begin.
- Saluyukeun polumeu nganggo MODÉ/CLK kenop.
- At the end of the record, the turntable may stop automatically depending on the auto-stop setting. Lift the tone arm and return it to the arm rest.

Gambar: A nutup-up view of the turntable platter and the tone arm with its red stylus cartridge. A black vinyl record is visible on the platter, and the tone arm is positioned over it, ready for playback.
Note on Auto-Stop: Some records may have a slightly different end groove position, which might cause the auto-stop feature to activate prematurely or not at all. If this occurs, you may need to manually stop playback or adjust the tone arm.
Maénkeun CD:

Gambar: The Trexonic Retro Record Player with its CD tray extended, showing a silver compact disc being inserted into the player. The display reads "OPEN".
- Pencét éta CD/USB/SD tombol pikeun milih modeu CD.
- Press the Eject button (usually indicated by a triangle with a line below it) to open the CD tray.
- Teundeun CD kalawan sisi labél nyanghareup ka luhur kana baki.
- Pencét tombol Eject deui pikeun nutup baki. Unit bakal maca disk.
- Pencét éta Play / Reureuh tombol pikeun ngamimitian playback.
- Use the Skip Forward/Backward buttons to navigate between tracks.
Ngagunakeun Bluetooth:
- Pencét éta AUX/BT button to select Bluetooth mode. The display will show "BT" and flash, indicating it's ready to pair.
- Dina alat anjeun anu nganggo Bluetooth (smartphone, tablet, jsb.), hurungkeun Bluetooth teras milarian alat anu sayogi.
- Select "Trexonic" or "TRX-16TRQ" from the list of devices.
- Once paired, the display will stop flashing and show "BT". You can now stream audio from your device to the record player.
- Control playback (play/pause, skip) from your connected device.
Listening to AM/FM Radio:
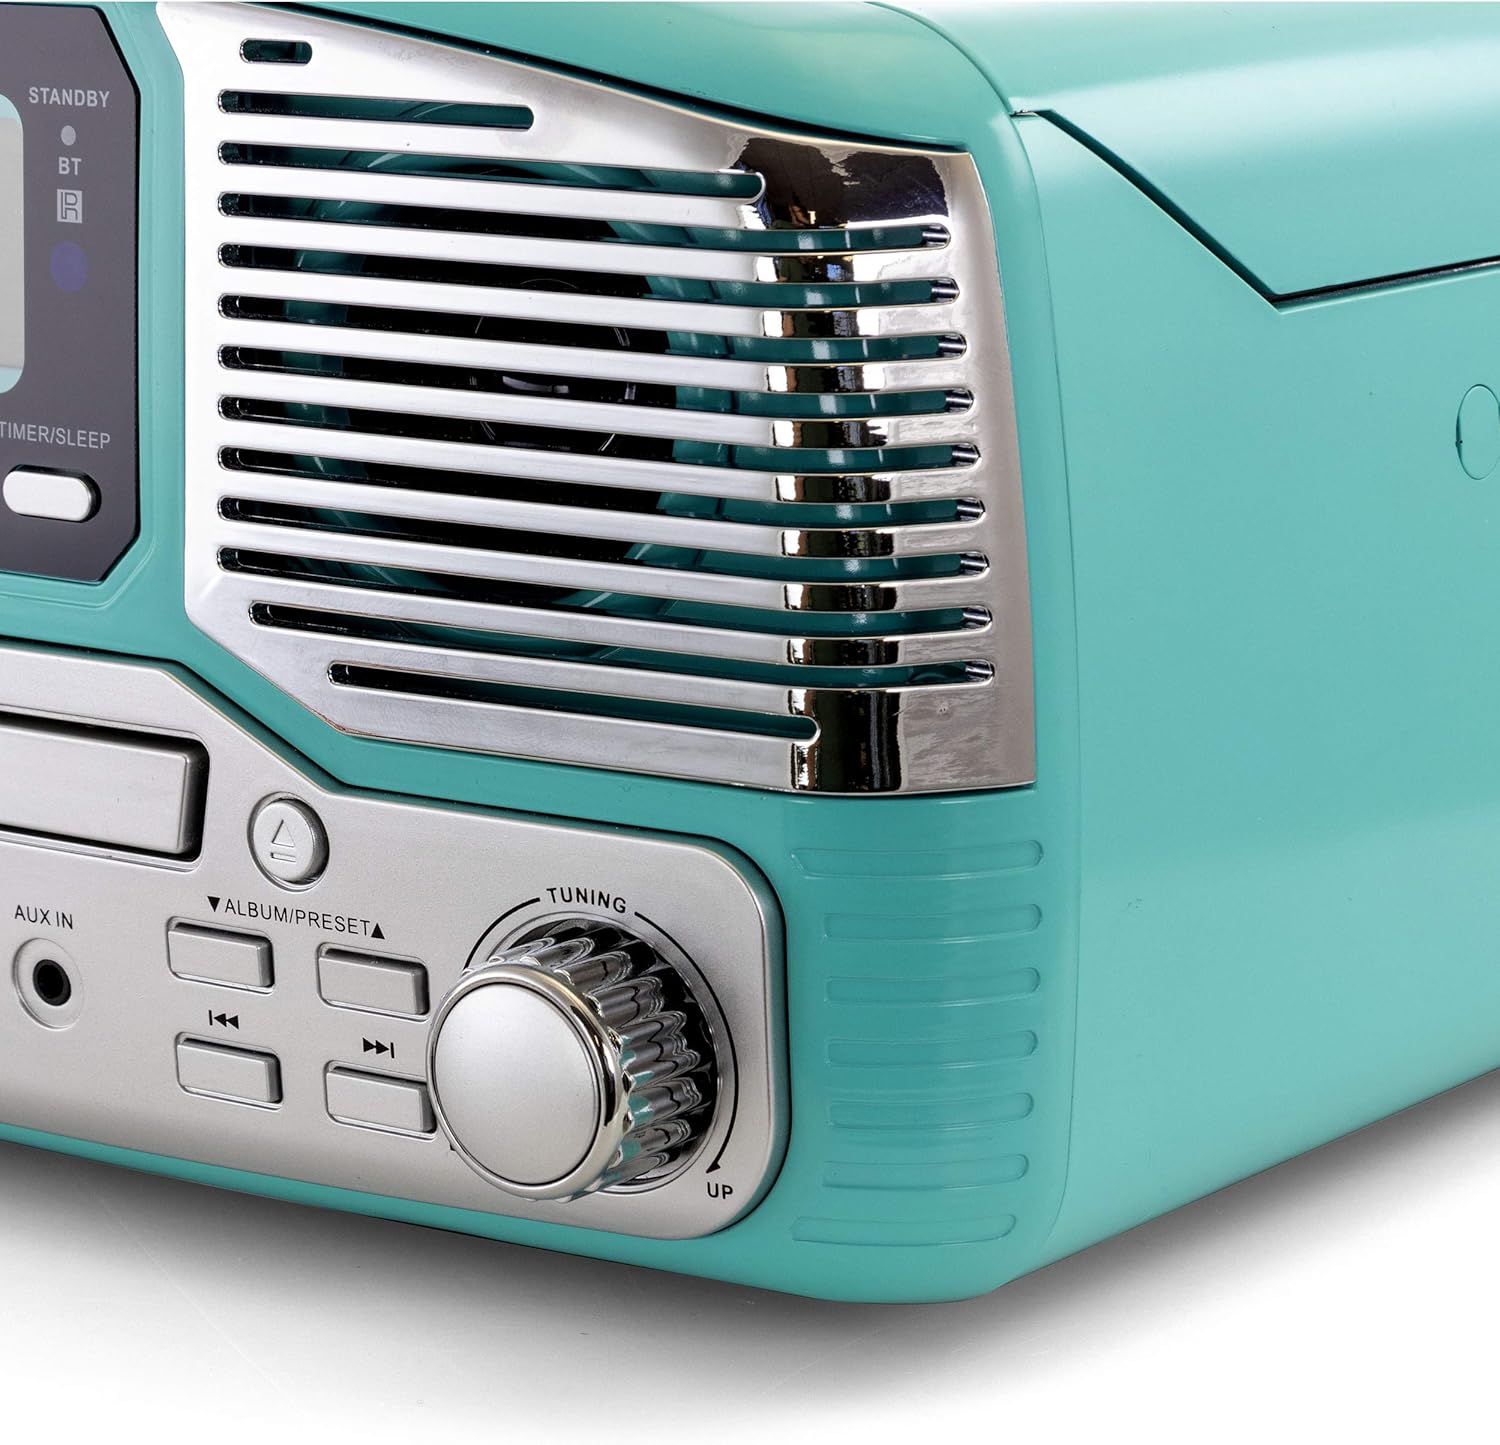
Gambar: Sisi nutup view of the Trexonic Retro Record Player, focusing on the right speaker grille and the large, chrome-finished tuning knob. The knob is labeled "TUNING" with "UP" and "DOWN" indicators.
- Pencét éta TUNER button to select radio mode.
- Puterkeun Kenop Tuning to manually tune to your desired AM or FM station.
- Pikeun scan otomatis, pencét terus tahan tombol Puterkeun / Reureuh / Scan button. The unit will scan and stop at the next strong station.
Using USB/SD Input:
- Selapkeun USB flash drive kana port USB atawa kartu SD kana slot kartu SD.
- Pencét éta CD/USB/SD button repeatedly until "USB" or "SD" appears on the display.
- The unit will automatically start playing compatible audio files (contona, MP3).
- Anggo tombol Puter/Pause sareng Luncat pikeun ngontrol putereun.
Recording to USB/SD (Vinyl to MP3):
- Pastikeun drive USB atanapi kartu SD parantos dipasang.
- Select the source you wish to record (e.g., PHONO for vinyl).
- Start playback of the source material.
- Pencét éta REC / DEL button. The display will indicate recording is in progress.
- Pencét éta REC / DEL tombol deui pikeun eureun ngarékam. Anu dirékam file bakal disimpen kana drive USB atanapi kartu SD.
Using Aux-In:
- Sambungkeun alat audio éksternal (contona, pamuter MP3, smartphone) ka NGARÉMÉ DI jack maké kabel audio 3.5mm (teu kaasup).
- Pencét éta AUX/BT tombol pikeun milih modeu AUX.
- Play audio from your external device. The sound will be output through the record player's speakers.
Ngadangukeun Headphone:
Plug standard 3.5mm headphones into the Jack headphone on the front panel for private listening. The built-in speakers will be muted automatically.
Pangropéa
Ngabersihan Unit:
- Salawasna cabut unit tina stop kontak sateuacan beberesih.
- Anggo kaén anu lembut sareng garing pikeun ngusap permukaan luar.
- Ulah make cleaners abrasive, lilin, atawa pangleyur sabab bisa ngaruksak finish.
Turntable Maintenance:
- Perawatan Stylus: The stylus (needle) is delicate. Handle it with care. Clean the stylus periodically with a soft brush, brushing from back to front.
- Panutup lebu: Tetep panutup lebu ditutup nalika teu dipaké pikeun ngajaga turntable tina lebu jeung lebu.
- Perawatan rékaman: Jaga rékaman anjeun bersih pikeun nyegah akumulasi lebu dina stylus sareng ningkatkeun kualitas sora.
Pangropéa CD Player:
- Anggo CD dina sisi-sisina pikeun nyingkahan sidik jari sareng goresan.
- Bersihkeun CD nganggo lawon anu lemes sareng henteu buluan, usap ti tengah ka luar.
- Do not use abrasive cleaners or solvents on CDs.
Pamérésan masalah
If you experience problems with your unit, please refer to the following table for possible solutions.
| Masalah | Mungkin Cukang lantaranana | Solusi |
|---|---|---|
| Taya kakuatan | Kabel listrik teu aman disambungkeun. | Check if the power cord is firmly plugged into the unit and the wall outlet. |
| Taya sora | Volume is too low or muted. Incorrect source selected. Headphones connected. | Increase volume. Select the correct input source (PHONO, CD, BT, etc.). Disconnect headphones. |
| Turntable not spinning or stopping prematurely | Speed setting incorrect. Auto-stop feature. | Ensure correct speed (33/45/78 RPM) is selected. Note that auto-stop may vary with some records. |
| CD teu diputer | CD dipasangkeun kalawan teu leres. CDna kotor atanapi calar. | Ensure CD is inserted label-side up. Clean or try a different CD. |
| Masalah papasangan Bluetooth | Device too far. Bluetooth not enabled on source. | Move device closer to the unit. Ensure Bluetooth is enabled on your device and the unit is in BT mode. |
| panarimaan radio goréng | Antenna not extended or positioned correctly. Interference. | Adjust the position of the FM wire antenna. For AM, rotate the unit for better reception. Move away from other electronic devices. |
Lamun masalah persists sanggeus nyobian solusi ieu, mangga ngahubungan rojongan customer.
spésifikasi
| Fitur | Rincian |
|---|---|
| Nomer modél | TRX-16TRQ |
| Sumber Daya | AC 100-240V ~ 50 / 60Hz |
| Speeds Turntable | 33 1/3, 45, 78 RPM |
| Konektipitas | Bluetooth, USB, SD, Aux-In, RCA Line-Out |
| Média Playback | Vinyl Records, CDs, MP3 (via USB/SD/Bluetooth) |
| Radio Tuner | AM/FM |
| Ukuran (approx.) | Ukuran 14.5 x 14.5 x 8.75 inci (L x W x H) |
| Beurat (approx.) | 7.24 pon |
| Warna | Pirus |
Garansi sareng Rojongan
Garansi kawates:
Trexonic warrants this product against defects in material or workmanship for a period of one (1) year from the original date of purchase. This warranty does not cover damage caused by accident, misuse, abuse, improper installation or operation, or unauthorized repairs. Proof of purchase is required for warranty service.
Rojongan Palanggan:
For technical assistance, troubleshooting, or warranty inquiries, please contact Trexonic Customer Service. Refer to the product packaging or the official Trexonic websitus pikeun inpo kontak panganyarna.
Sumberdaya Online: Visit the official Trexonic websitus kanggo FAQ, pendaptaran produk, sareng sumber daya dukungan tambahan.


