1. Bubuka
Hatur nuhun pikeun meuliasing the Udreamer Turntable Vinyl Record Player Model UD001. This manual provides essential information for the proper setup, operation, and maintenance of your new record player. Please read these instructions carefully before use to ensure optimal performance and longevity of the product. Keep this manual for future reference.

Image 1.1: Udreamer Turntable Vinyl Record Player Model UD001. This image shows the turntable with its clear dust cover open, revealing the black platter, tonearm, and cartridge.
2. Parentah Kasalametan
- Sumber Daya: Anggo ngan ukur adaptor kakuatan anu ditangtukeun. Pastikeun voltage cocog catu daya lokal Anjeun.
- Cai sareng Uap: Ulah ngantepkeun unit ieu kakeunaan hujan, kalembaban, atanapi cairan. Ulah neundeun barang-barang anu dieusi cairan, sapertos vas, dina unit ieu.
- Panas: Ulah nempatkeun unit deukeut sumber panas kayaning radiators, registers panas, kompor, atawa alat sejenna (kaasup ampLiifiers) anu ngahasilkeun panas.
- Ventilasi: Pastikeun ventilasi anu leres. Ulah meungpeuk sagala bukaan ventilasi.
- beberesih: Cabut colokan unit tina stop kontak témbok sateuacan dibersihkeun. Anggo lawon anu lemes sareng garing hungkul.
- Palayanan: Entong nyobian ngalayanan produk ieu nyalira. Rujuk sadayana ngalayanan ka tanaga jasa anu mumpuni.
- panempatan: Tempatkeun unit dina permukaan anu stabil sareng rata pikeun nyegah karusakan murag.
3. Eusi Paket
Mangga parios heula sadaya barang anu didaptarkeun di handap ieu kalebet kana pakét anjeun:
- Udreamer Turntable Unit
- Panutup lebu
- Plat
- Dirasakeun Mat
- counterweight
- 45 RPM Adaptor
- Adaptor kakuatan
- Kabel USB
- Manual pangguna (dokumén ieu)
4. Produk Langkungview
Familiarize yourself with the various parts and controls of your Udreamer Turntable.

Image 4.1: Key features of the Udreamer Turntable. This image highlights the turntable's capabilities such as Vinyl to Computer conversion, Bluetooth output, iron platter, built-in phono equalizer, needle pressure adjustment, speed alignment, and moving magnet cartridge.

Gambar 4.2: Detil view of the turntable's components. This image shows the solid iron platter for stability and the moving magnet cartridge, which provides accurate audio reproduction and has a longer lifespan.

Image 4.3: Internal and external components of the turntable system. This diagram illustrates the belt-driven mechanism, arm lifter, record mat, foot pads for vibration isolation, and the 45 RPM adapter.
4.1 Hareup jeung Luhur View
- Panutup lebu: Ngajaga platter sareng tonearm tina lebu.
- Piring: The surface on which records are placed.
- Spindle: Nyimpen rékaman dina tempatna dina piring.
- Dirasakeun Mat: Provides cushioning for records and reduces static.
- Tonearm: Nyepeng cartridge sareng stylus.
- Kartrid nganggo Stylus: Maca alur dina rékaman éta.
- counterweight: Nyaimbangkeun tonearm sareng nyaluyukeun gaya pelacak.
- Lever Panyekel: Ngangkat jeung nurunkeun tonearm gently.
- Tonearm Istirahat: Secures the tonearm when not in use.
- Pamilih laju: Switches between 33 1/3 and 45 RPM.
- Kontrol pitch: Adjusts playback speed fine-tuning.
4.2 Panel tukang
- LINE/BT OUT/PHONO Switch: Selects output mode (Line Out, Bluetooth Out, Phono Out).
- RCA Output Jacks (L/R): Connects to external active speakers or an amppangagung.
- USB-PC Port: Connects to a computer for vinyl-to-digital conversion.
- DC IN Jack: Nyambungkeun adaptor kakuatan.
- Saklar Daya Hurung / OFF: Ngahurungkeun atanapi mareuman unit.
5. Setélan
5.1 Ngabongkar sareng Nempatkeun
- Carefully remove the turntable from its packaging. Retain packaging for future transport.
- Place the turntable on a stable, level surface, away from direct sunlight, heat sources, and excessive dust or vibrations.
5.2 Platter jeung Beubeur Instalasi
- Teundeun platter kana spindle tengah.
- Carefully lift the felt mat to expose the drive belt underneath the platter.
- Locate the motor pulley (a small brass cylinder) on the top left of the turntable chassis.
- Using the provided ribbon or your fingers, gently stretch the drive belt and hook it around the motor pulley. Ensure the belt is flat and not twisted.
- Place the felt mat back on the platter.
5.3 Pangaluyuan Beurat Pangimbang
Proper counterweight adjustment is crucial for optimal sound quality and to prevent damage to your records and stylus.

Image 5.1: Counterweight and Pitch Adjustment. This image illustrates how to accurately adjust the tonearm pressure using the counterweight and fine-tune the playback speed with the pitch control.
- Cabut pelindung stylus lalaunan.
- Place the counterweight onto the rear of the tonearm. Rotate it clockwise until it is fully threaded.
- Release the tonearm from its rest. Move the cueing lever to the down position.
- Carefully rotate the counterweight until the tonearm is perfectly balanced horizontally, floating freely without touching the surface or rising too high.
- Once balanced, hold the counterweight steady with one hand and rotate the numbered ring on the front of the counterweight until '0' aligns with the line on the tonearm.
- Rotate the entire counterweight (including the numbered ring) counter-clockwise to the recommended tracking force. For the pre-installed magnetic cartridge, a typical tracking force is between 2.5 to 3.5 grams. Refer to your cartridge's specific recommendations if available.
- Return the tonearm to its rest and engage the tonearm clamp.
5.4 Pamasangan Panutup Kekebul
Insert the hinges of the dust cover into the hinge receptacles at the rear of the turntable chassis.
5.5 Sambungan Daya
Connect the power adapter to the DC IN jack on the rear of the turntable, then plug the adapter into a wall outlet.
6. Parentah Operasi
6.1 Basic Record Playback
- Teundeun catetan dina piring. Lamun maén single 45 RPM, nempatkeun adaptor 45 RPM dina spindle munggaran.
- Select the appropriate speed (33 1/3 or 45 RPM) using the speed selector switch.
- Ensure the LINE/BT OUT/PHONO switch is set to 'LINE OUT' or 'PHONO' if connecting to external speakers, or 'BT OUT' for Bluetooth.
- Turn on the turntable using the Power ON/OFF switch.
- Lepaskeun tonearm tina tempatna.
- Angkat tonearm ngagunakeun uas cueing.
- Posisikeun tonearm sacara manual di luhur alur awal rekaman anu dipikahoyong.
- Turunkeun tonearm lalaunan nganggo tuas isyarat. Stylus bakal némpél kana rékaman, sareng pamuteran bakal dimimitian.
- At the end of the record, the auto-stop function will stop the platter rotation. Lift the tonearm, return it to its rest, and turn off the turntable.
6.2 Pangaluyuan Nada
Use the Pitch Control knob (refer to Image 5.1) to fine-tune the playback speed. Rotate the knob to increase or decrease the speed slightly.
6.3 Bluetooth Output
The turntable can wirelessly stream audio to Bluetooth-enabled devices such as headphones, speakers, or soundbars.

Image 6.1: Bluetooth Output functionality. This image demonstrates the turntable's ability to wirelessly connect to various Bluetooth receivers like earphones, soundbars, and external speakers.
- Ensure the LINE/BT OUT/PHONO switch on the rear is set to 'BT OUT'.
- Turn on your Bluetooth receiving device (e.g., speaker, headphones) and set it to pairing mode.
- Turn on the turntable. The Bluetooth indicator light on the turntable will flash, indicating it is searching for a device.
- Once paired, the Bluetooth indicator light will become solid. Audio from the turntable will now play through your Bluetooth device.
- Upami pasangan gagal, pareuman kadua alat teras cobian deui.
6.4 Vinyl to Computer Recording (USB-PC)
You can convert your vinyl records into digital audio files using the USB-PC output.

Image 6.2: Vinyl to Computer conversion setup. This image shows the turntable connected to a laptop via a USB cable, illustrating the process of converting vinyl audio to MP3 format for computer playback.
- Connect the USB cable from the turntable's USB-PC port to an available USB port on your computer.
- Ensure the LINE/BT OUT/PHONO switch is set to 'LINE OUT' or 'PHONO'.
- Install and open audio recording software on your computer (e.g., Audacity, a free open-source software).
- In your recording software's preferences, select the turntable as the audio input device (it may appear as 'USB Audio CODEC' or similar).
- Start recording in the software, then begin playing your record on the turntable (refer to Section 6.1).
- Once the record finishes, stop recording in the software and save your digital audio file.
6.5 Connecting External Speakers (RCA)
The turntable features RCA output jacks for connecting to external active speakers or an amppangagung.
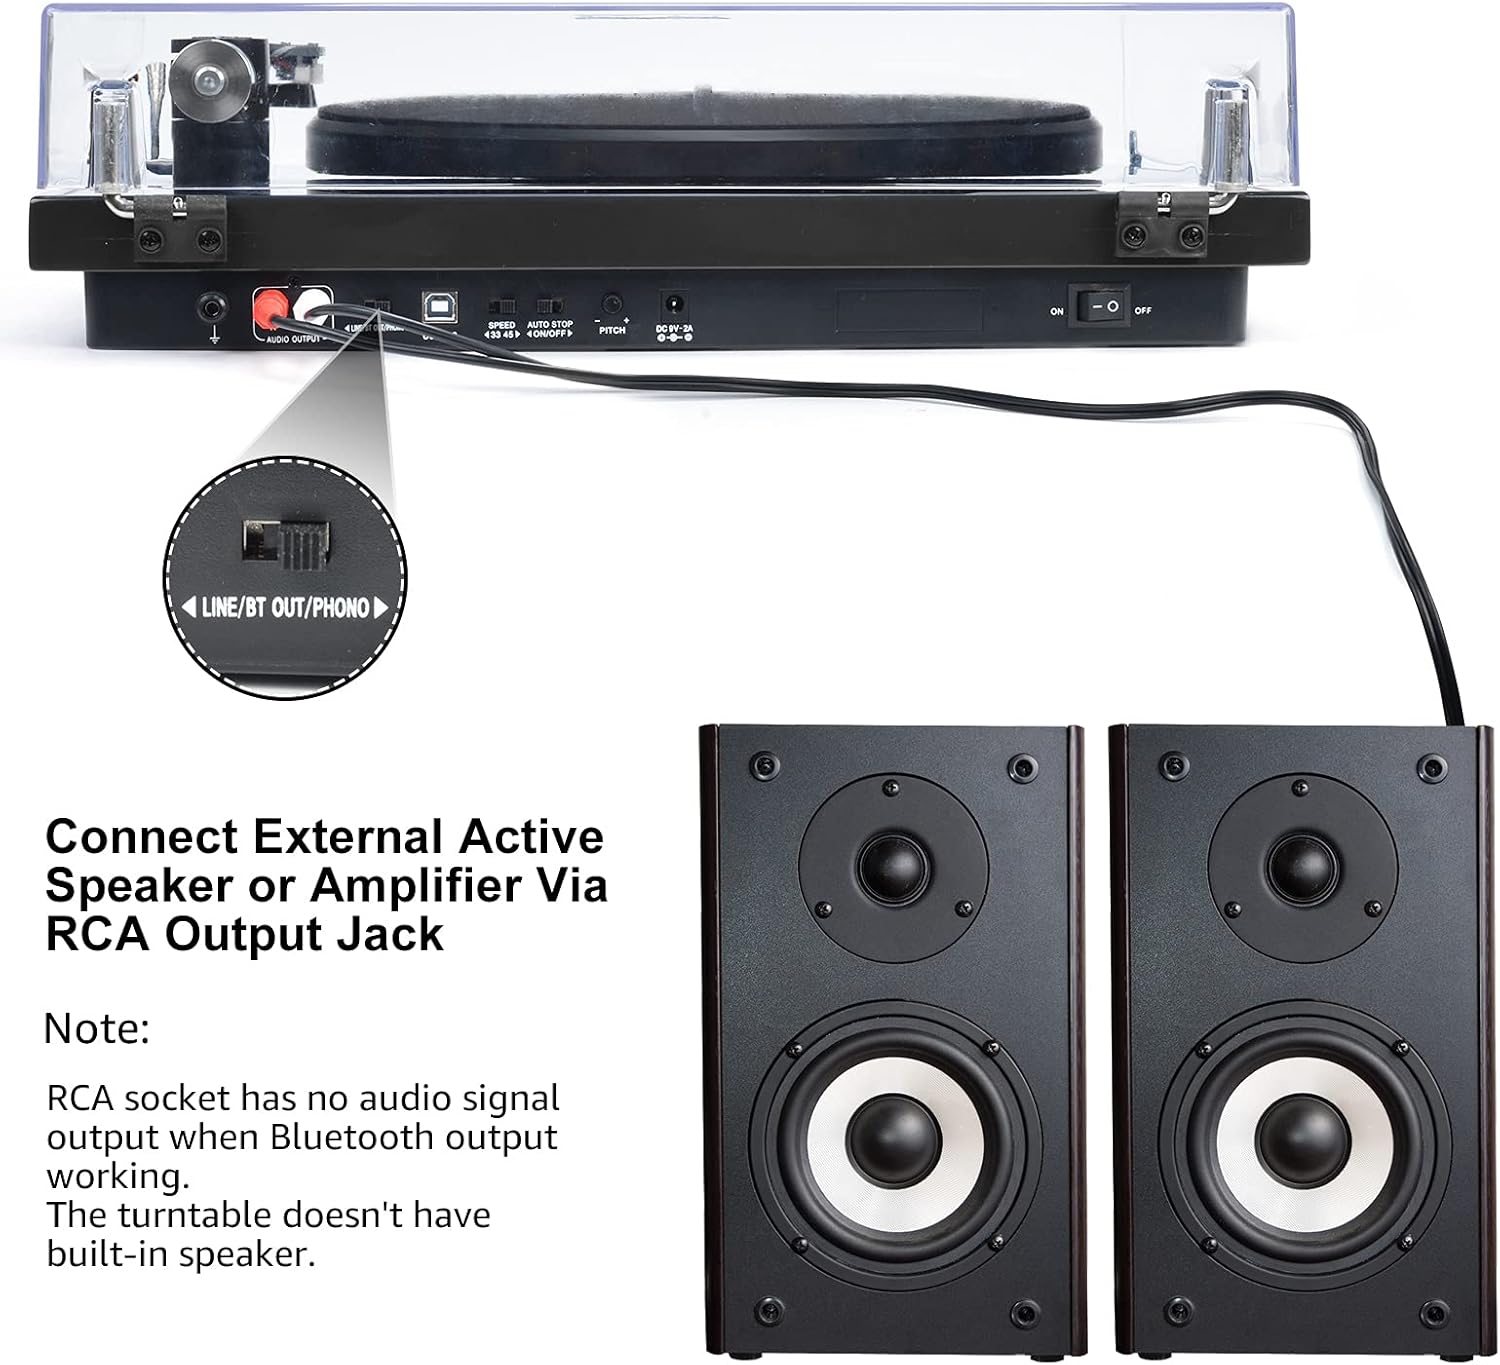
Image 6.3: Connecting to external speakers. This image shows the rear panel of the turntable with the RCA output jacks connected to a pair of external active speakers, indicating how to route audio for amplified playback.
- Ensure the LINE/BT OUT/PHONO switch on the rear is set to 'LINE OUT' if connecting to active speakers (speakers with their own ampLifier) atanapi an amplifier's 'LINE IN' input. Set to 'PHONO' if connecting to an amplifier with a dedicated 'PHONO' input.
- Connect the RCA cables (red for right channel, white for left channel) from the turntable's RCA output jacks to the corresponding input jacks on your active speakers or amppangagung.
- Turn on your external audio system and adjust the volume.
Catetan: The Udreamer Turntable Model UD001 does not have built-in speakers. An external audio system (active speakers, amplifier, or Bluetooth device) is required for sound output.
7. Pangropéa
7.1 beberesih
- Unit Turntable: Wipe the exterior with a soft, dry, lint-free cloth. Do not use harsh chemicals or abrasive cleaners.
- Panutup lebu: Clean with a soft cloth and a mild, non-abrasive cleaner. Avoid scratching the surface.
- Stylus: Use a soft stylus brush, brushing gently from back to front (in the direction of play) to remove dust and debris. Never use your fingers.
7.2 Panggantian Stylus
The stylus (needle) is a consumable part and will wear out over time, typically after 300-500 hours of playback. A worn stylus can damage your records and degrade sound quality. Replace the stylus when you notice a decrease in sound quality or visible wear.
- Gently grasp the front of the cartridge body.
- Pull the old stylus assembly downwards and forwards to detach it from the cartridge body.
- Sejajarkeun rakitan stylus anyar jeung awak kartrid teras dorong ka luhur jeung ka tukang nepi ka ngaklik dina tempatna.
- Re-adjust the tracking force if necessary after replacing the stylus.
8. Cara ngungkulan
Upami anjeun mendakan masalah sareng turntable anjeun, tingal masalah sareng solusi umum ieu:
| Masalah | Mungkin Cukang lantaranana | Solusi |
|---|---|---|
| Taya kakuatan | Power adapter not connected; Power switch off | Ensure power adapter is securely plugged in; Turn power switch ON |
| Taya sora | Incorrect output mode selected; External speakers not connected/powered; Bluetooth not paired | Set LINE/BT OUT/PHONO switch correctly; Connect/power on external speakers; Pair Bluetooth device |
| Sora anu robah warna atawa ngaluncat | Stylus dirty or worn; Tracking force incorrect; Turntable not level; Record dirty or damaged | Clean or replace stylus; Adjust counterweight; Place turntable on a level surface; Clean record |
| Piring teu muter | Drive belt dislodged or broken; Auto-stop engaged | Re-install or replace drive belt; Ensure tonearm is over the record to disengage auto-stop |
| Nyapasangkeun Bluetooth gagal | Device too far; Device not in pairing mode; Interference | Move devices closer; Ensure receiving device is in pairing mode; Restart both devices |
9. Spésifikasi
| Fitur | Spésifikasi |
|---|---|
| Dimensi produk | 12.8 x 9.8 x 4.7 inci |
| Item Beurat | 5.79 pon |
| Nomer Modél Item | UD001 |
| merek | Tukang ngalamun |
| Fitur husus | Diwangun-Di Bluetooth panarima |
| Bahan | palastik |
| Gaya | Vintage |
| Alat nu cocog | Headphone, Spéker |
| Tipe Motor | Motor AC |
| Format Sinyal | Digital |
| Sumber Daya | Kabel Listrik |
| Rasio Signal-to-Noise | 60 dB |
10. Garansi jeung Rojongan
Udreamer products are designed and manufactured to the highest quality standards. For warranty information or technical support, please refer to the contact details provided with your purchase or visit the official Udreamer website. Please have your model number (UD001) and purchase information ready when contacting support.


