Bubuka
The AUTOPHIX F803 is a professional diagnostic tool designed for heavy-duty trucks and cars. It offers comprehensive system diagnostics, DPF regeneration functions, and standard OBD2 capabilities. This manual provides detailed instructions for its proper use and maintenance.
Fitur konci
- DPF Regeneration Functions: Supports OEM-level DPF functions for Cummins, Detroit, Caterpillar, and Paccar engines, including DPF regen, reset, and related information reset.
- Diagnostik Sistim lengkep: Reads and clears trouble codes, displays ECU information, and shows live data for all systems in diesel trucks (Engine, ABS, SRS, SAS, Transmission, TPMS, ESP, EPB, Suspension, etc.).
- Kasaluyuan kandaraan lega: Supports major truck models complying with SAE J1939/J1708/J1850/J1587/J27145 protocols, including Volvo, Mack, International, Freightliner, Peterbilt, Kenworth, Western Star, Cummins, Caterpillar, Detroit, Paccar, Isuzu, Fuso. Also supports OBD2 diagnostics for most cars, minivans, and light trucks from 1996 onwards.
- PIN Detect & Simulation Mode: Measures OBD port voltage and diagnoses connection status. Includes a simulation/demo mode for beginners.
- Hardware ditingkatkeun: Features a 5-inch LCD display, 1GB RAM/8GB ROM, DC 10V-36V/3A power input, 2.4GHz WiFi, Quad-Core ARM Cortex-A7 CPU, and a capacitive touchscreen.
- Pembaruan Gratis Saumur hirup: Provides constant software and database updates via WiFi.
Eusi pakét
The F803 diagnostic tool package typically includes:
- F803 Unit Utama
- Diagnostic Cables (e.g., OBDII, 6-pin, 9-pin connectors)
- Kabel USB
- Manual pamaké
- Mawa Kasus
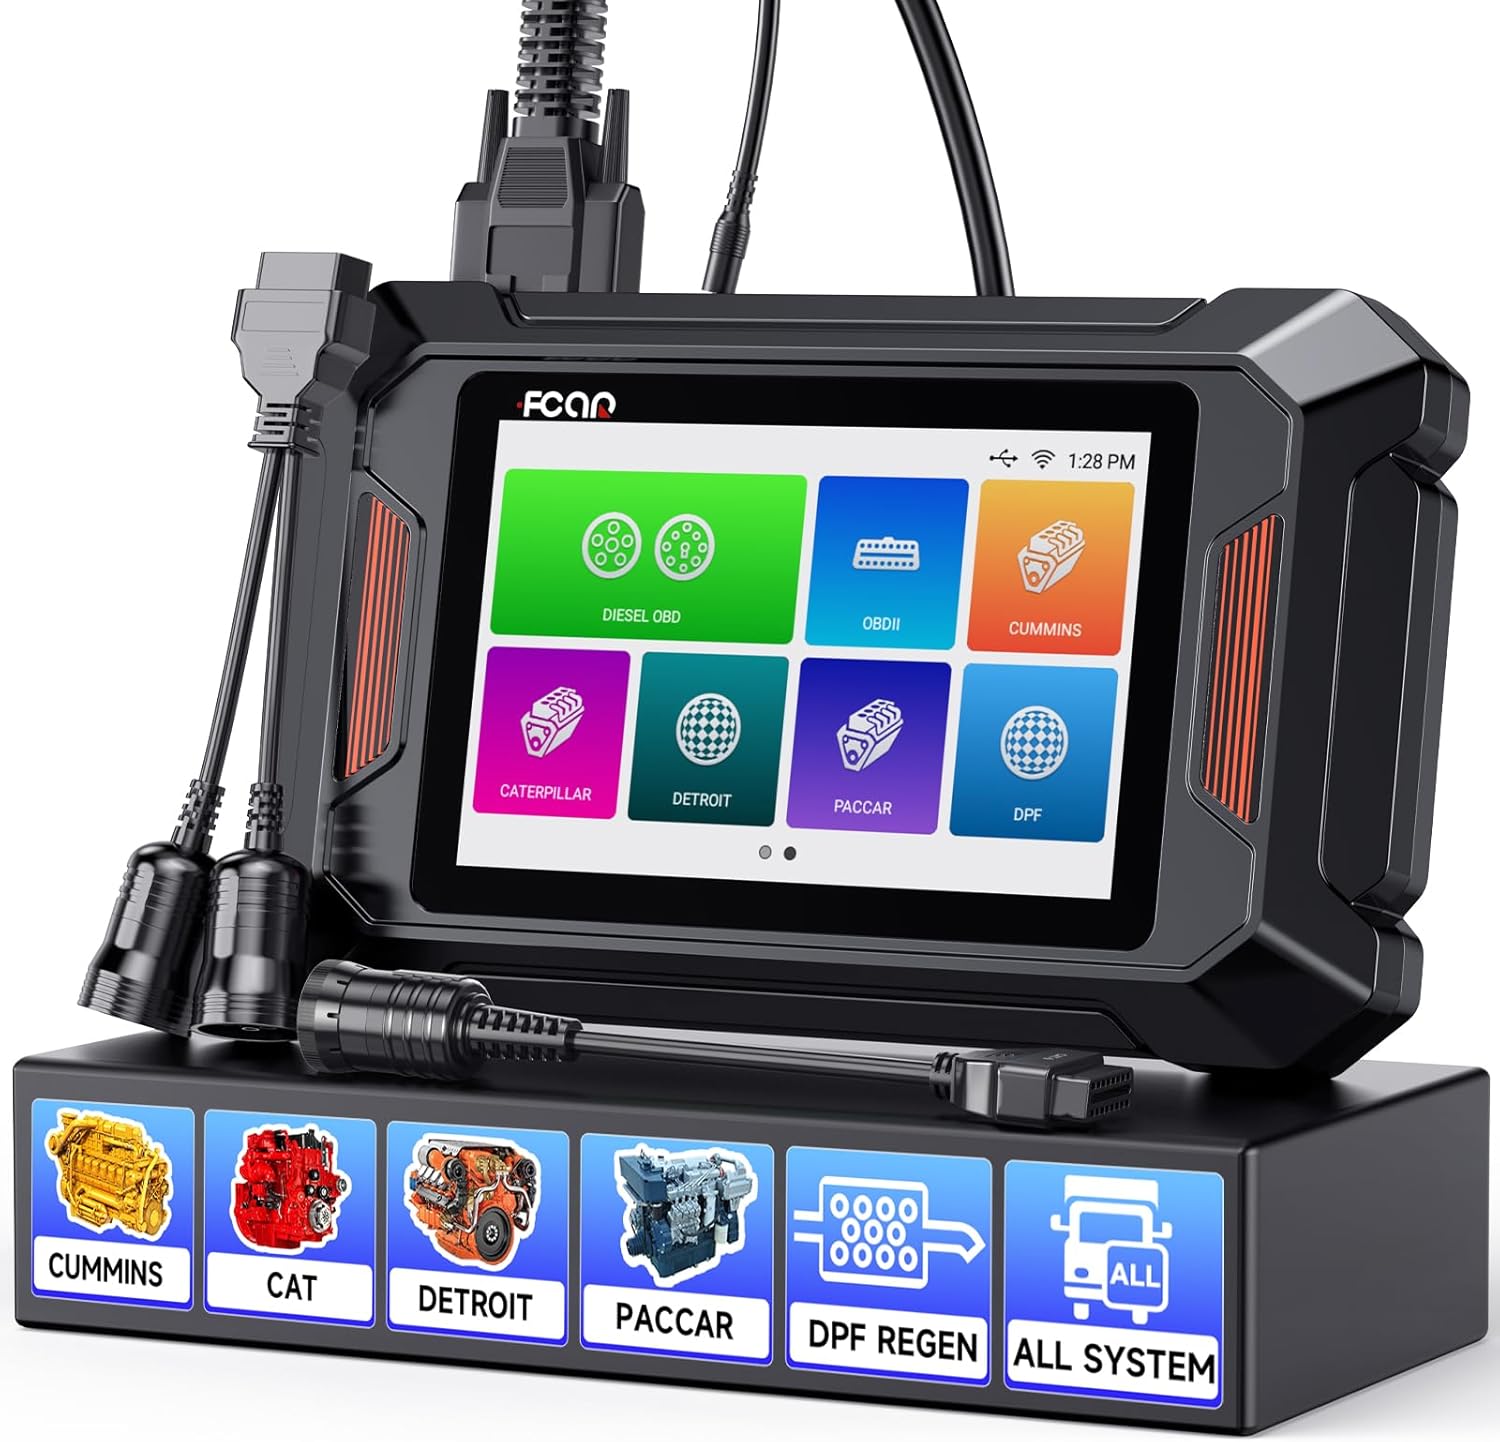
Image: The AUTOPHIX F803 diagnostic scanner with various diagnostic cables and connectors, displayed on a stand.
Disetél
- Ngeusi batre alat: Ensure the F803 unit is sufficiently charged before first use. Connect the device to a power source using the provided USB cable if needed.
- Daya Hurung: Pencét jeung tahan tombol daya pikeun ngahurungkeun alat.
- Setup Awal: Follow the on-screen prompts to select language (English or Spanish), set time zone, and connect to a Wi-Fi network for updates.
- Aktipkeun Alat: The device requires activation. Follow the one-click activation process as prompted on the screen.
- Apdet parangkat lunak: Connect to Wi-Fi and navigate to the update section to download and install the latest software and vehicle databases. This ensures compatibility with the newest vehicle models and features.
Parentah Operasi
Nyambung ka Kandaraan
- Locate the Diagnostic Port: For heavy-duty trucks, this is typically a 6-pin, 9-pin, or 16-pin (OBDII) connector, often found in the cab or near the dashboard. For cars, it's usually a 16-pin OBDII port under the dashboard.
- Select Appropriate Cable: Choose the correct diagnostic cable for your vehicle's port.
- Sambungkeun scanner: Plug one end of the diagnostic cable into the F803 unit and the other end into the vehicle's diagnostic port.
- Hurungkeun Ignition: Hurungkeun ignition kendaraan ka posisi "ON" (mesin pareum).
- PIN Detect (Optional): Use the "PIN Detect" function on the F803 to verify the connection status and voltage of the OBD port.
Performing Diagnostics (Heavy Duty Trucks)

Image: Diagram illustrating the F803's ability to scan various truck systems including Engine, ABS, SRS, Transmission, Suspension, and more.
- Select "Diesel OBD" or Specific Manufacturer: From the main menu, choose "Diesel OBD" for general heavy-duty diagnostics or select a specific manufacturer (e.g., Cummins, Caterpillar, Detroit, Paccar) if available for more advanced functions.
- Idéntifikasi Kendaraan: The scanner will attempt to automatically identify the vehicle. If unsuccessful, you may need to manually enter vehicle information.
- Sistem Scan: Select "Full System Scan" to diagnose all available electronic control units (ECUs) or choose specific systems (e.g., Engine, ABS, Transmission) for targeted diagnostics.
- Baca/Hapus Kodeu: View diagnostic trouble codes (DTCs) and their descriptions. After addressing the underlying issue, clear the codes.
- Data Langsung: Monitor real-time sensor data in text or graphical format to observe vehicle performance and identify anomalies.
- Émbaran ECU: Access detailed information about the vehicle's ECUs.
DPF Regeneration Functions

Image: Diagram illustrating the Diesel Particulate Filter (DPF) and Diesel Exhaust Fluid (DEF) system, showing the DPF regeneration process.
The F803 supports various DPF functions for compatible engines.
- Access DPF Menu: From the main menu or specific manufacturer menu, navigate to the DPF functions.
- Pilih Fungsi: Choose the desired DPF function, such as:
- DPF Regenerasi
- DPF Reset
- DPF Related Information Reset
- DPR State Reset
- Forced DPD Regen
- Ash Service Regen
- Reset Soot Level
- Turutan ajakan dina layar: The tool will guide you through the specific steps required for each DPF function. Ensure all safety precautions are followed.
OBDII Diagnostics (Cars & Light Trucks)

Image: Illustration showing the F803 performing OBDII diagnostics on both a heavy-duty truck and a passenger car, highlighting functions like Read Codes, Erase Codes, Live Data, and I/M Readiness.
- Select "OBDII": From the main menu, choose the "OBDII" option.
- Baca Konci: Retrieve generic and manufacturer-specific diagnostic trouble codes.
- Hapus Code: Hapus DTC sareng mareuman Indikator Malfungsi Lamp (MIL) saatos perbaikan.
- Aliran Data Langsung: View real-time operational parameters of the engine.
- Kesiapan I / M: Pariksa status monitor anu aya patalina sareng émisi.
- Freeze Data Frame: View gambaran kaayaan operasi nalika aya gangguan anu aya patalina sareng émisi.
- Tés Sénsor O2: Retrieve O2 sensor monitoring test results.
- Tes Monitor On-Board: Candak hasil pikeun komponén sareng sistem powertrain anu aya hubunganana sareng émisi.
- Uji Sistem EVAP: Initiate a test of the evaporative emission system.
- Émbaran Kandaraan: Candak nomer idéntifikasi kandaraan (VIN), ID kalibrasi, sareng nomer verifikasi kalibrasi (CVN).
Fungsi tambahan
- Potret layar: Candak gambar layar pikeun dokuméntasi.
- Eupan balik: Send diagnostic feedback to technical support.
- Create/Send Report: Generate diagnostic reports and send them via email.
- Data Réview & Playback: Review previously recorded diagnostic data.
Wide Truck Compatibility Overview

Image: Visual representation of the F803's compatibility with various truck brands including Freightliner, Peterbilt, International, Caterpillar, Volvo, and Ford Pickup.

Image: A table detailing F803 compatibility across various engine types (Cummins, Caterpillar, Paccar, Detroit) and corresponding vehicle brands and models.
Pangropéa
- Tetep Bersih: Wipe the device with a soft, dry cloth. Avoid using abrasive cleaners or solvents.
- Toko anu leres: Store the F803 in its protective case in a dry, cool environment when not in use.
- Apdet parangkat lunak: Regularly update the software via Wi-Fi to ensure optimal performance and access to the latest vehicle data.
- Perawatan batré: Avoid fully discharging the battery frequently. Charge the device regularly, especially if stored for extended periods.
- Pamariksaan kabel: Periodically inspect diagnostic cables for any signs of damage (fraying, bent pins). Replace damaged cables immediately.
Pamérésan masalah
- Alat teu hurung:
- Ensure the battery is charged. Connect to a power adapter.
- Pariksa tombol daya pikeun fungsi ditangtoskeun.
- Teu aya komunikasi sareng kendaraan:
- Verify the ignition is in the "ON" position.
- Check if the diagnostic cable is securely connected to both the F803 and the vehicle's OBD port.
- Ensure the correct diagnostic cable is used for the vehicle.
- Use the "PIN Detect" function to check the OBD port's voltage and connection status.
- Try the scanner on another compatible vehicle to rule out a vehicle-specific issue.
- Software update failed:
- Ensure a stable Wi-Fi connection.
- Pariksa rohangan panyimpenan anu cekap dina alat éta.
- Restart the device and try the update again.
- Layar henteu ngaréspon:
- Laksanakeun reset lemes ku cara nahan tombol daya dugi ka alat ngamimitian deui.
- Pastikeun layar beresih jeung bebas tina lebu.
spésifikasi
| Fitur | Rincian |
|---|---|
| Modél | F803 |
| tampilan | 5-inch LCD, Capacitive Touchscreen |
| Prosesor | Quad-Core ARM Cortex-A7 |
| Mémori | 1GB RAM / 8GB ROM |
| Operasi Voltage | DC 10V-36V / 3A |
| Konektipitas | Wi-Fi 2.4GHz |
| Diménsi | 28 x 15 x 10 cm (kira-kira) |
| Protokol anu dirojong | SAE J1939, SAE J1708, SAE J1850, SAE J1587, SAE J27145, OBDII |
| Basa anu Dirojong | Inggris, Spanyol |

Image: Visual representation of the F803's enhanced hardware components, including the 5-inch LCD, 1GB RAM/8GB ROM, DC 10V-36V/3A power, 2.4GHz WiFi, Quad-Core ARM Cortex-A7 CPU, and capacitive screen.
Garansi sareng Rojongan
The AUTOPHIX F803 diagnostic tool comes with a 2-year warranty. Additionally, a 60-day free return period for refund or replacement is offered.
For technical assistance, the manufacturer provides 24/7 technical support. Users can utilize the "Feedback" function within the device to send diagnostic logs and inquiries directly to support.
Lifetime free software updates are provided via Wi-Fi to ensure the device remains current with the latest vehicle technologies and diagnostic capabilities.


