1. Bubuka
This manual provides detailed instructions for the assembly, operation, and maintenance of your GeeekPi DeskPi RackMate T1 8U Server Cabinet. This 10-inch server rack is designed to accommodate various data, network, audio, and video equipment, making it suitable for home labs, small offices, or studio environments.
The RackMate T1 features an aluminum alloy frame and translucent acrylic side panels, offering both durability and a clear view of your installed equipment. Its open design facilitates easy access for installation and maintenance, while also promoting optimal airflow for cooling.

Image 1.1: GeeekPi DeskPi RackMate T1 8U Server Cabinet (Silver)
2. Eusi Paket
Before beginning assembly, please verify that all components listed below are present in your package. If any parts are missing or damaged, please contact customer support.

Gambar 2.1: Leuwihview of included components
- Aluminum Rod x4 (for vertical frame)
- Aluminum Rod x2 (for horizontal support)
- Aluminum Alloy Handle x2
- Acrylic Protection Plate x2 (side panels)
- Micro HDMI to HDMI Adapter Board x2
- SBC Shelf x1 (for Single Board Computers)
- 10 inch 1U Rack x1
- Fixing Plate x1 (optional fan installation)
- Acrylic Top Cover x1
- Blank Panel 10 inch 1U Rack x3
- Anti-slip Protection Mat x4
- Anti-vibration Rubber Feet x4
- M3 Screwdriver Cross x1
- M2.5 Hexagon Screwdriver x1
- Various Screws and Washers (KM4x20mm x4, #10-32 5/16 x24, KM4x16mm x12, KM4x10mm x4, M4x8mm x4, M2.5x7+6mm x4, M3x5mm x8, M2.5x5+5mm x16, M2.5x5mm x20, M2.5x6x4mm x4)
3. Product Specifications and Dimensions
The DeskPi RackMate T1 is an 8U rack with a 10-inch width, designed for compact server and network setups.

Image 3.1: Product Dimensions and Key Features
- Jangkungna rak: 8U (1U = 1.75 inches, total height approximately 14 inches)
- Max Mountable Depth: 7.87 inci (200mm)
- Bahan pigura: Aluminium Alloy
- Panel samping: Akrilik tembus
- Ukuran (L x W x H): Approximately 11.06 x 8.34 x 17.75 inches (281mm x 212mm x 451mm)
- warna: pérak
- Jumlah modél: VCDP-0022
- Majelis Diperlukeun: Sumuhun
- Tipe Pamasangan: Rak Gunung
4. Setup jeung Parentah Majelis
The DeskPi RackMate T1 is designed for straightforward assembly. Follow these general steps:
- Ngabongkar komponén: Cabut sadaya bagian tina bungkusna kalayan ati-ati teras pariksa kana daptar eusi bungkusna.
- Kumpulkeun pigura:
- Attach the four vertical aluminum rods to the base and top plates using the appropriate screws and washers. Ensure all connections are secure.
- Install the two horizontal aluminum rods for additional structural support.
- Pasang Panel Samping: Secure the translucent acrylic protection plates to the sides of the assembled frame using the designated screws.
- Install Handles and Feet: Attach the aluminum alloy handles to the top of the rack. Apply the anti-slip protection mats and anti-vibration rubber feet to the bottom of the rack.
- Mount Rack Units:
- The rack supports 10-inch wide, 1U height equipment.
- Install the provided 10-inch 1U rack units, SBC shelf, and blank panels into the desired positions within the frame using the appropriate screws.
- The SBC shelf is designed for single-board computers like Raspberry Pi or Jetson Nano.
- The fixing plate can be used for optional fan installation to enhance cooling.
- Manajemén Kabel: Plan your cable routing as you install equipment to maintain an organized and efficient setup.
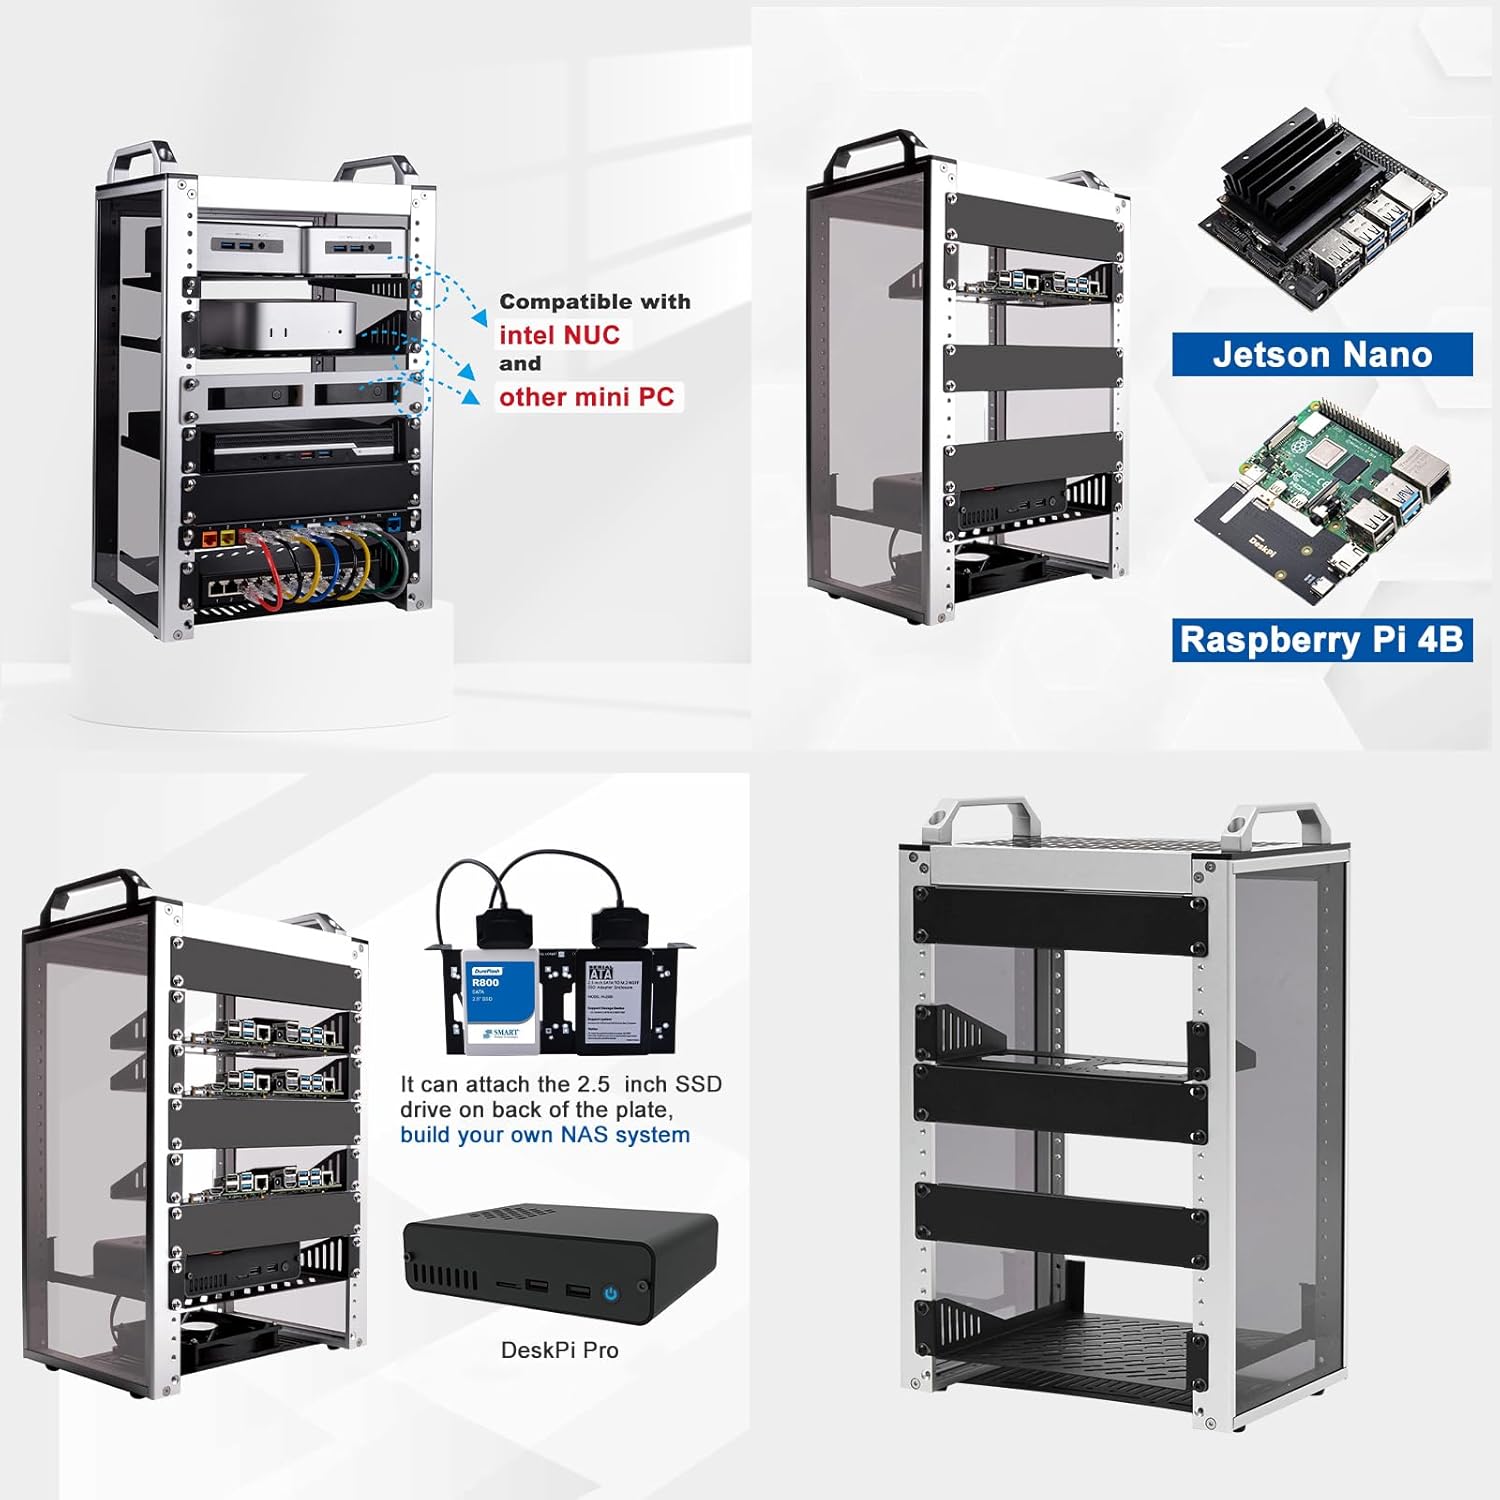
Image 4.1: Rack compatibility with various mini PCs and SBCs

Gambar 4.2: Example of a populated rack with organized cabling
5. Prinsip Operasi
The DeskPi RackMate T1 provides a structured environment for your computing and networking equipment. Its open design allows for easy access and airflow.
- Pamasangan Parabot: Mount your 10-inch rack-compatible devices (e.g., network switches, mini PCs, storage devices) onto the rack units. Ensure proper ventilation for all devices.
- Manajemén Kabel: Utilize cable ties and routing channels to keep cables organized and prevent obstruction of airflow. This also simplifies troubleshooting and maintenance.
- Cooling: The open design naturally aids in cooling. For equipment with higher thermal output, consider installing optional fans on the designated fixing plate to improve heat dissipation.
- Aksesibilitas: The open sides and front allow for quick access to ports and components without needing to disassemble the rack.

Image 5.1: A compact server rack in operation

Image 5.2: Various usage scenarios for the server cabinet
6. Pangropéa
Regular maintenance ensures the longevity and optimal performance of your server cabinet and the equipment housed within it.
- beberesih: Periodically wipe down the aluminum frame and acrylic panels with a soft, damp cloth. Avoid abrasive cleaners that could scratch the surfaces.
- Ngaleungitkeun lebu: Due to its open design, dust accumulation can occur. Use compressed air or a soft brush to remove dust from equipment and rack surfaces to maintain proper airflow and prevent overheating.
- sekrup tightness: Over time, screws may loosen. Periodically check all screws and tighten them as necessary to ensure structural stability.
- Pamariksaan kabel: Inspect cables for any signs of wear, fraying, or damage. Replace damaged cables immediately to prevent connectivity issues or electrical hazards.
7. Cara ngungkulan
This section addresses common issues you might encounter with your server cabinet setup.
- Issue: Rack feels unstable after assembly.
Solusi: Ensure all screws are fully tightened. Double-check that all frame components are correctly aligned and seated. The anti-vibration rubber feet should be properly installed on a flat surface.
- Issue: Equipment overheating.
Solusi: Verify that there is adequate space around each piece of equipment for airflow. Ensure no cables are blocking ventilation ports. Consider installing additional cooling fans on the designated fixing plate if temperatures remain high.
- Issue: Difficulty mounting a device.
Solusi: Confirm that your device is compatible with 10-inch rack standards. Ensure you are using the correct type and size of screws for mounting. Some devices may require specific mounting brackets (not included with the rack) to fit properly.
8. Garansi jeung Rojongan
The GeeekPi DeskPi RackMate T1 Server Cabinet comes with a manufacturer's warranty. Please refer to the details below:
- Garansi Pabrikan: 90-day manufacturer's warranty.
- Kasadiaan suku cadang: Information regarding spare parts availability is not provided.
- Apdet parangkat lunak: Teu lumaku pikeun produk ieu.
For technical support or warranty claims, please contact GeeekPi customer service through their official channels or the retailer where the product was purchased.


