1. Bubuka
The GeeekPi DeskPi RackMate T1 is an 8U 10-inch server cabinet designed for organizing network, server, audio, and video equipment. Constructed from aluminum alloy and acrylic, this mini chassis is suitable for creating a compact cluster or home assistant server. Its open and translucent design facilitates easy access, maintenance, and optimal cooling for your devices.
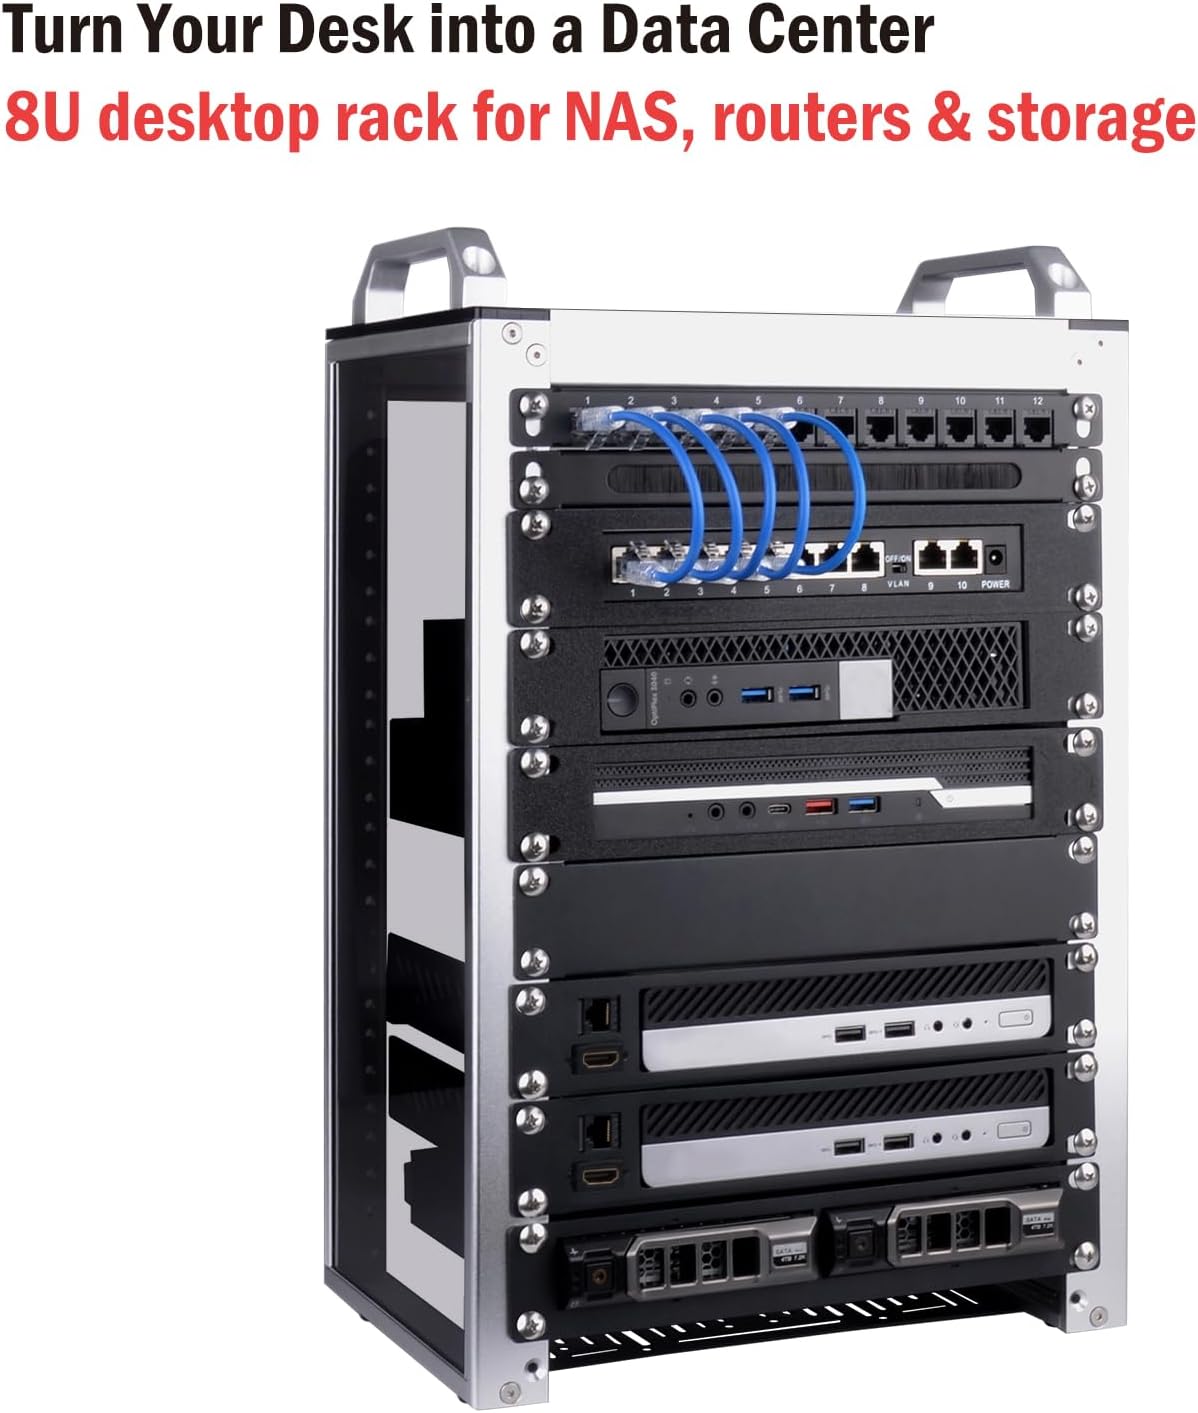
Figure 1: Fully assembled DeskPi RackMate T1 with example parabot.
2. Fitur Produk
- Desain kompak: Features a 10-inch width and 7.87-inch depth, making it space-efficient for small offices, home environments, or enterprise settings. Dimensions are 11 x 7.8 x 16 inches.
- 8U Standard Height: Provides 8U of vertical space, equivalent to 14 inches, for mounting various rack-compatible devices.
- Open Structure: The open design allows for convenient installation and maintenance of internal components, while also promoting efficient airflow for cooling.
- Translucent Acrylic Sides: Both side panels are made of translucent acrylic, offering dust resistance, reduced weight, and direct visibility of the cabinet's interior.
- Konstruksi awét: Built with a robust aluminum alloy frame and acrylic panels for stability and longevity.
- Majelis Gampang: The cabinet arrives flat-packed with all necessary hardware and tools for straightforward assembly.

Figure 2: Product dimensions of the DeskPi RackMate T1.

Figure 3: DeskPi RackMate T1 with optional handles removed for space-saving.
3. Eusi Paket
The DeskPi RackMate T1 package includes all components required for assembly and initial setup. Please verify all items are present before beginning assembly.

Figure 4: Comprehensive list of included accessories.
- Aluminum Rods (various sizes)
- Acrylic Protection Plates
- Acrylic Top Cover
- 1U Rack Shelf
- 1U Venting Blank Panel
- Blank Panel 10 inch 1U Rack
- Fixing Plate (for optional fan installation)
- Aluminum Alloy Handles
- Anti-slip Protection Mats
- Anti Geter Suku Karét
- M3 Screwdriver (cross)
- M2.5 Hexagon Screwdriver
- Various Screws (KM4x20mm, M4x8mm, KM4x10mm, KM4x16mm, #10-32 5/16)
- Micro HDMI to HDMI Adapter Boards (KL-P24 V1.0) for Raspberry Pi
4. Parentah Majelis
Follow these steps carefully to assemble your DeskPi RackMate T1 server cabinet. Refer to the included user manual for detailed diagrams.
- Nyiapkeun komponén: Unpack all components and lay them out on a clean, flat surface. Identify all parts using the provided accessories list.
- Assemble Side Frames: Attach the aluminum rods to the acrylic protection plates using the appropriate screws. Ensure the orientation matches the diagrams in the manual.
- Pasang Pelat Dasar: Secure the bottom vented plate to the assembled side frames. Note that an optional cooling fan can be installed on this plate.
- Install Top Cover and Handles: Place the acrylic top cover and attach the aluminum alloy handles using the specified screws.
- Mount Shelves and Blank Panels: Install the 1U rack shelf, venting blank panel, and other blank panels into the desired positions within the frame. These can be adjusted later to accommodate your equipment.
- Install Adapter Boards (Optional): If using Raspberry Pi or similar boards, install the Micro HDMI to HDMI adapter boards into the designated slots on the shelves.

Figure 5: Assembly steps 1-4.

Figure 6: Assembly steps 5-8.
Video 1: Official GeeekPi DeskPi RackMate T1 unboxing and assembly guide. This video provides a visual walkthrough of the assembly process, demonstrating how to unpack components and put the server cabinet together.
5. Parentah Operasi
Once assembled, the DeskPi RackMate T1 is ready to house your equipment. Its open design allows for flexible placement and easy access.
- Penempatan Parabot: Carefully slide your 10-inch rack-compatible devices onto the shelves. Ensure proper alignment with the mounting holes.
- Manajemén Kabel: Utilize the open structure to route cables efficiently, preventing clutter and ensuring optimal airflow.
- Cooling: For enhanced cooling, an 80mm or 120mm fan can be installed on the bottom plate. Ensure proper fan orientation for effective airflow.

Figure 7: Optional fan installation on the base plate.
6. Pangropéa
Regular maintenance helps ensure the longevity and optimal performance of your server cabinet.
- beberesih: Use a soft, dry cloth to wipe down the aluminum frame and acrylic panels. Avoid abrasive cleaners that may scratch the surfaces.
- Ngaleungitkeun lebu: Periodically remove dust from inside the cabinet and from any installed fans to maintain efficient cooling.
- sekrup tightness: Check all screws periodically to ensure they remain tight, especially after moving the cabinet or reconfiguring equipment.
7. Cara ngungkulan
Ieu sababaraha masalah umum sareng solusi poténsial:
- Equipment Not Fitting: Ensure your equipment is 10-inch rack-compatible. The internal clearance between the aluminum side pieces is approximately 8.75 inches. Adjust shelf positions as needed.
- Kateustabilan Kabinet: Verify all screws are securely tightened during assembly. Ensure the anti-vibration rubber feet are properly installed on the bottom of the cabinet.
- Overheating: Check that any installed cooling fans are functioning correctly and oriented to promote proper airflow. Ensure adequate space around the cabinet for ventilation.
8. Spésifikasi
| Atribut | Rincian |
|---|---|
| merek | GeeekPi |
| Modél | DeskPi RackMate T1 |
| Jangkungna rak | 8U |
| Lebar | 10 inches (internal clearance ~8.75 inches) |
| Jerona | 7.87 inci (200mm) |
| Ukuran produk (L x W x H) | 11.02 x 7.87 x 17.28 inci |
| Bahan | Aluminium, Acrylic |
| Warna | pérak |
| Item Beurat | 10.48 pon |
9. Garansi jeung Rojongan
Specific warranty details for the GeeekPi DeskPi RackMate T1 are not provided within this manual. For comprehensive warranty information, technical support, or to inquire about replacement parts, please visit the official GeeekPi websitus atanapi ngahubungan layanan palanggan maranéhanana langsung.


